
Saving Energy with Plants
There are many ways to invest in a house to reduce the amount of power and money needed to keep it comfortable year round such as insulation, air tight construction, and more efficient equipment. However, people sometimes overlook what a well-designed layout of trees, bushes, and other plantings can do to contribute to a passive heating and cooling strategy. Mechanical heating and cooling systems are designed to react to changes of temperature after they occur, but smart landscaping can control how the sun and wind interact with your home and prevent or moderate these temperature swings, leaving less work for your home’s mechanical systems. Strategically planted trees can be used as an aid/alternative to mechanical climate control by providing shade and blocking or guiding the winds that blow across your site, which can help maintain a comfortable home environment. Direct sunlight can provide light and warmth but also has the potential to overheat and over-light a space, making it more expensive to keep comfortable. When planting trees for shade, consider where and when you want sunlight coming into your house. In the northern hemisphere, most sunlight comes from the east, south, and west throughout the day, with afternoon/late day sun being the most intense with the most potential to overheat a house. Shade trees planted to the east and west of the house can protect the interior from the brightest and most direct sunlight of the day. Direct southern sunlight can provide free warmth in the winter but has the potential to overheat the same rooms during the summer. While evergreen trees provide a solid column of shade throughout the year, a leafy deciduous tree with its foliage concentrated on the upper portion of the trunk can provide shade from the high angle summer sun while allowing the lower angle winter sun to shine through to warm and light the house when the trees lose their leaves. Study the differences between these trees throughout the year and use this information to decide which trees you need to get the kind of shade you’re looking for. When laying out any tree shading strategy, take into account the full-grown size and shape of the trees you’re planting as well as the angles of the sun throughout the year so that they can be placed where they will be most effective once established. Trees are also useful for blocking and guiding the winds and breezes that blow across your site throughout the year, though this may be more commonly useful on larger sites. If your house is consistently buffeted by cold winter winds coming from the south, a mixed row of evergreen trees and squat bushes/shrubs can push these winds upwards and allow them to pass over the top of your house without stripping your valuable heat off the walls. Again, deciduous and evergreen trees can serve different roles here, with evergreen trees acting as a solid wall to oncoming winds and deciduous trees allowing winds to twist and wind between their trunks and below their canopies. Both can be useful depending on your goals. If there is a cool summer breeze that blows across your site, rows of plantings can also be used to guide rather than block, leading refreshing breezes into your open windows that would otherwise blow by. Laying out your site’s planting to address both sunlight and wind has the potential to significantly reduce power bills by keeping your house from getting too hot or cold in the first place, reducing the need for mechanical heating or cooling. While trees and bushes can have a dramatic effect on your home’s sun and wind exposure, vines are another effective tool for helping keep your house comfortable with less mechanical assistance. Evergreen vines planted against a sunny exterior wall will raise their leaves to the sun and breathe out water vapor (a process known as transpiration) during the summer, which cools the air around them and allows this cooled air to pass over the walls of your house, which helps keep the temperature down. During the winter, these same evergreen vines will become more dormant and lower their leaves against the wall, which creates a pocket of air which can add a small amount of insulation R-value to those walls. Deciduous vines are another helpful option which can be used with a strategy similar to using deciduous trees for seasonal shade. Allowing deciduous vines to grow over a trellis located along your house’s sunniest southern walls can provide shady exterior and interior areas with gentler, filtered sunlight that will also help keep these areas cooler. In the winter, these vines will die back and allow the more desirable winter sun to shine through and warm your house. If you’ve got a green thumb, you can even use food-producing vines to provide both shade and summer snacks. When choosing plants to execute these ideas, remember to seek out native species wherever possible, as these generally have an easier time getting established and thriving in the local environment without additional watering and caretaking, and can contribute to creating a familiar habitat for the other inhabitants of the local ecosystem. If no local species can meet your needs, make sure the plants chosen are not invasive and do not clash with local food chains. If you are interested in exploring these ideas further, there are many resources available online, at your local nursery, and in books on passive cooling and similar strategies involving landscaping in combination with buildings. Good luck! Photo by Nathaniel Willson. © Nathaniel Willson 2018. All rights reserved.
Collecting and Storing Rainwater: The Planning Stage
While publicly provided water is often the default choice of home builders and owners because of its convenience of access and use, more and more people are choosing to harvest and store their own water on site to use for irrigation, cleaning, washing, flushing, and drinking. This can be done to supplement or completely replace public water. Some hope to save money or gain complete financial freedom from the utility companies, while others hope to reduce their demand on the environment, as public water requires considerable energy to move from source to user, and it is rarely extracted without impacting the ecosystems that we share the water with. For people living beyond the reach of municipal services as well as those in the cities, having a reserve of water at your home provides security against seasonal shortages, droughts, and even emergencies such as fire (some insurance companies appreciate these measures! See what your insurer says about it). Those of you who have on site access to a source of water may be considering finding some way to hold on to it for your own use rather than watching it all flow by, whether it is a spring, a stream, a well, or rain falling on your roof. While the easiest and cheapest use for on-site water storage is meeting irrigation needs, it is possible for those of you building a new home or renovating your current home to integrate your tank or cistern both visually and functionally with the house itself for indoor uses if you are willing to include the code-required filtration measures. Before going shopping, you will need to determine how big your tank will need to be, where it will need to be placed or built, and what material it should be made from, followed by making sure your tank has all the basic components necessary to provide clean water for a long time with as little trouble as possible. Knowing these things first will help you understand/estimate the associated costs up front and allow you to approach designers, builders, plumbers, or tank and cistern manufacturers with more confidence in the feasibility of your plan. First and foremost, you will want to figure out how big your tank will need to be, because not running out of water is a top priority. This is determined by balancing the amount of water coming from your source against the amount of water being withdrawn for use throughout the year. Using another real-life example, if you know that you will spend more than you will make in December because of the holidays, then you can set aside the excess income from previous months so that you know it will be there when you need it. For a gardener storing rainwater harvested from their roof, they know that they will need their water in the summer, but most of it will be harvested over the colder months while the rains are frequent. Their tank will need to be big enough to harvest enough through the colder months to provide all summer. Someone who has a spring or well producing a set number of gallons per minute year round may have some needs met on demand no problem, but using the washing machine while someone else showers and a third person cleans dishes will need more water for those 20 minutes than the spring can provide. Their tank will collect the steady stream while nobody uses it (overnight) and then be able to provide for the “peak demand” when it comes (usually in the afternoon/evening), and may not need to be as large as the gardener’s. If you are also planning for drought or fire protection, this volume may need to be considered separately from what is provided for everyday use. You can use your water bill to begin to understand your home’s water needs, and further research at home and online can further help you pin down the GPD (gallons per day) your house uses. If this number is beyond what your source can provide for, consider the introduction of water saving fixtures, appliances, and habits that can bring demand down if you haven’t already. The rate that your source produces water will also need to be measured as accurately as possible, so as not to misjudge availability. For rainwater harvesting, there are explanations on how to calculate the harvesting potential of your roof and site in our previous blog entry on rainwater harvesting, as well as local climate data on annual and monthly rainfall available online. After you know how big your tank(s) will be, you will be able to determine where it should go. Limitations on your site such as size, city codes, and location of existing structures may do much to make the decision for you, but where possible you should account for both the location of the water source and the point(s) of use, which would be your home’s plumbing fixtures and/or your garden. Placing the tank below the source and above the point of use allows gravity to provide both pressure and flow for your water as it moves from the source to the sink, so to speak. This saves energy and can decrease or eliminate the need for pumps, saving money and preventing the undesirable possibility that you will lose access to your water if the pumps lose power or break down, although some appliances or uses will need more pressure than gravity can produce, making a small pump necessary. Tanks and cisterns can be installed on solid ground, underground, or atop a structure like a roof or water tower. If you find that placing the tank underground or on a structure are the best options, you will probably need the help of an engineer to ensure the safety and stability of the design. Buried tanks can collapse under soil pressure when they aren’t completely full if they aren’t made specifically for being buried. These tanks will also likely require pumps to access the water, and can be more difficult or inconvenient to access for cleaning and maintenance. Tanks on roofs or other elevated structures require adequate structural stability to handle the massive load of hundreds or thousands of gallons of water, so professional assistance from an engineer will likely be necessary to ensure that your design is safe. Finally, you will want to know what material your tank will be made of. While the material’s ability to meet your tanks design’s structural requirements is very important, it is also important to consider that the water you store and use will spend a lot of time in contact with the tank itself, and different materials can have different effects on the water’s toxicity and taste. For example, glass is an ideal storage medium for small to medium sized applications because it is completely inert (non-toxic) and does not affect the water’s taste, while plastics (PVC especially) can leach small amounts of harmful toxins into the water over time and make it taste like plastic if the tank is exposed to the sun during the day. In Western Washington, Douglas Fir and Western Red Cedar rain barrels will seem a visually appealing option that naturally resists rot. However, the stuff that makes this wood smell good and resist rot is toxic, and can seep into any water in contact with the wood. While this consideration is important for any people/plants/animals that will use the water, cost and availability will also likely affect your decision. Galvanized steel and concrete can both be very expensive, plastic is often cheaper. If you look around your neighborhood or online, you could find used drums and barrels being sold or even given away. This can be a good quick solution that keeps costs down, but make sure that the container in question did not previously hold any hazardous or toxic materials. If this cannot be determined, be a very cautious buyer, as this container will be holding your water. The other cost of any material is the environmental cost. Production of new steel requires enormous amounts of energy and generates considerable waste material that does not return quickly or cleanly to Earth’s natural systems, and both steel and petroleum-based plastics are non-renewable resources. In this regard, it is important to know what your tank is made of, where it comes from, and to utilize reused or recycled materials where possible. These are the essential design considerations to tackle when planning out your water storage system, and with this information in hand, you can feel more confident shopping for and applying your design solution to the problem of water security. If for any reason you feel you cannot tackle some or any of the above questions, there are professional designers and engineers who are willing and able to help you realize your water storage dreams. Feel free to see who in your area works with or specializes in home-scale water storage and other “green” living practices. For those who want more in-depth knowledge of water system design, much of the information in this post and more can be found in the water harvesting and storage related books by Art Ludwig and Brad Lancaster, who both have written extensively about their experience designing and building water systems in many different economic situations, scales, and locations. Additionally, we will cover the essential parts and pieces of an effective water storage system for any who would like to read further. Thank you for reading! Written by: James Drumwright IV, Architectural Designer at H2D Architecture + Design
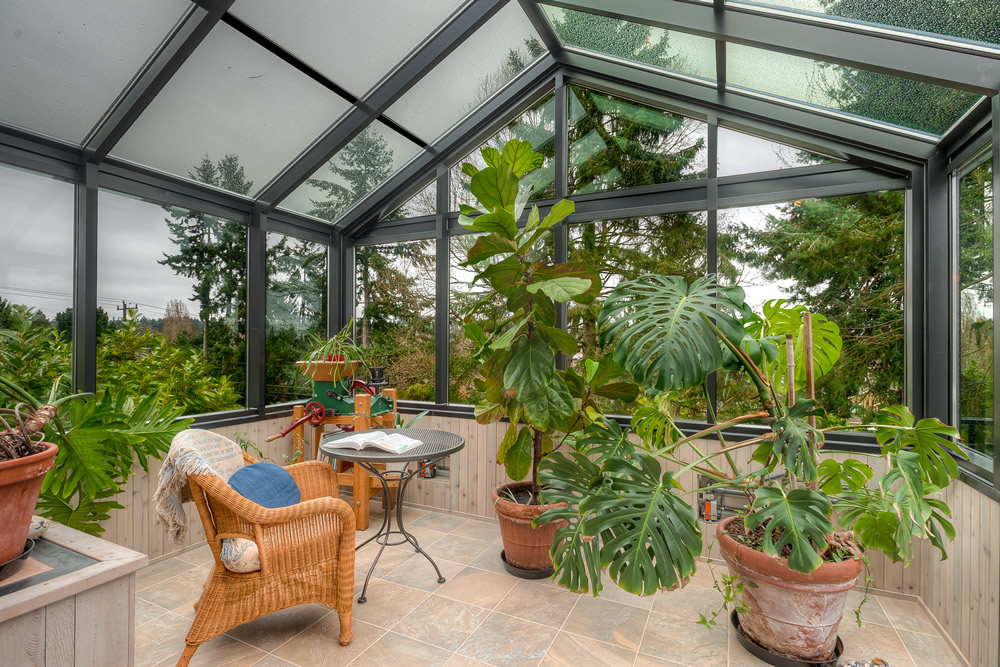
Welcome the Sun Indoors
The solar orientation of a home will affect the level of comfort experienced inside. A few key design moves can help lower energy bills and increase interior comfort. Orientation The orientation of a home will set the stage for how much solar energy can be harvested to warm the indoors throughout the winter. The longest side of the house should face south so that a large portion of the wall area has access to direct sunlight. Depending on what rooms are most occupied, these should be located at the south side of the house. Window Placement To take advantage of the sun’s heat during the winter the southern façade will benefit from large windows. Depending on the latitude of the building’s location, the sun will reach varying heights in the sky during the winter season. But its height in the winter is always lower than in the summer, therefore penetrating deeper into the house. Taking advantage of this sustainable approach to heating a home can reduce the amount of forced air necessary to heat the indoors. In the Pacific Northwest, the majority of the year requires heating, so designing for the cold time of year is important. Roof Overhang Of course, it’s also important to remember the hot summer months. In the summer the sun is higher in the sky. Therefore the sun’s rays strike the house at a steep angle so that the direct sunlight is less likely to travel as deep inside. To keep out the sun’s heat it is important to block direct sunlight from reaching the windows. Roof overhangs play an important role in shading the window area from the sunshine. A larger roof overhang will be more effective. Designing a roof overhang correctly to block the sun in the summer but allow the sun’s rays indoors during the winter can be tricky and requires fine-tuning. While these are ideal steps to take for improving interior comfort levels, home owners can encounter obstacles which require compromises. Such obstacles include north-south lot orientations, existing coniferous trees blocking access to the sun, in addition to nearby neighboring houses obstructing the southern exposure. Whatever the location of your home, it is possible to plan for and reap the benefits of solar orientation, whether that may be for a newly constructed home, or a remodel for a home that is already standing. Taking initial steps for a well-oriented house is valuable to residents and is environmentally sound. In addition these are also the first steps in designing a net-zero home, something a homeowner may strive for now or in the future. Taking advantage of the sun’s path throughout the different seasons can lead to a brighter and warmer home. And let’s not forget about the saving that can be made from lower heating bills. Written by Carmen Ulrich, Architectural Designer at H2D Architecture + Design
Making a great first impression
The entryway sets the tone for your house’s design, mood, and guest experience. This space should reflect your style and personality while creating a welcoming atmosphere. Whether you have a grand foyer or a small apartment nook, these key design elements will help make the most of your entryway. The Front Door The front door can often be overlooked, but it is the first point of contact for your guests. If you are a home-owner choose a bold paint color to create an eye-catching focal point in the exterior and interior. Current color trends: Lime Green, Charcoal Gray, Classic Red. Not a fan of bold colors? Unique door hardware is a great way to make a tangible first impression as guests enter your home. If you rent and aren’t allowed to alter your door, an entry mat with a bold pattern or texture will set your unit apart from all the rest. Clean & Clutter Free! Proper storage in your entry will help you make an organized first impression. A large entry is perfect for built-in storage: closets, cubbies, or even a separate mud-room to keep the dirt out of your home. Small spaces can achieve the same effect using a hall tree, wall-hooks, or a small console to drop your keys/mail as you come and go. Current trends: DIY pallet with hooks, refurbished and bold colored consoles. Décor Choose a focus piece in your entryway and keep the other elements simple and complimentary. Large spaces lend way to choosing a chandelier or pendant as the focal point for a classic design approach. Other options are a grand staircase, furniture, or area rug. Some creative ideas for smaller spaces are shelves with personal framed photos, a ladder to hang coats/purses/scarves on, or even a unique wall mirror (which will help your space seem larger). Current trends include: inspirational quotes (on canvas or wall decals), floor mirrors, and bold wall colors and patterns. Whether you’re designing on a budget or doing a complete overhaul, have fun with your entryway design and choose elements that will help reflect your personality and keep you organized! By: Lisa Kramer, H2D Architecture + Design