
Stair Design 101
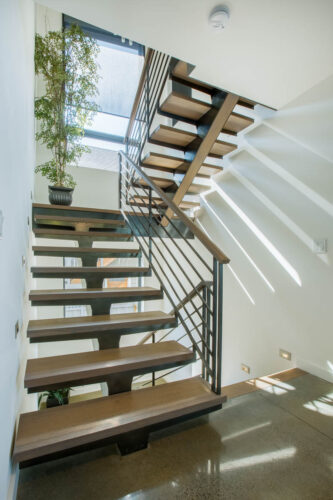
Whether you’re building new, adding on, or remodeling a multistory home there’s one element that can have a major impact on your space planning: stairs. With so many options on layouts and styles, this guide will help you get started on thinking about your stairs. Under most circumstances (and in most jurisdictions under the current code) there are a few basic requirements to keep in mind when planning for a new stair in a residential project. Must be at least 36” wide. Cannot have a riser higher than 7 ¾” (residential) The landing at the top and bottom of the stair must at minimum be as wide as the stair and the depth to match the stair width. Must have minimum 6’-8” clear head space between nose of riser and ceiling/finish above. There are a few exceptions for the above for stairs leading to attics and small lofts. Step 1: Stair Shapes There are many different types of stairs with unique space considerations and dimensions to keep in mind. Straight Run: The most common stair type, this stair goes in one straight line typically without any landings other than the top and bottom. Straight run stairs are a great fit for narrower spaces with a lot of length to work with. L-Shape: Much like the name indicates this stair has a landing somewhere in the run with a 90 degree turn. L-Shape stairs are great for small spaces as they can be tucked into a corner and leave a good amount of usable floor space. U-Shape: This stair is similar to the L-Shape but has a 180 degree turn at the landing. This stair is ideal for wider more generous spaces since they tend to take up more floor area than the other shapes. Spiral: A helical/circular stair more commonly used as an accent stair or in very small spaces. These stairs can have a great visual impact to a space but tend to be less safe than the other shapes and not recommended for areas with a lot of foot traffic. Step 2: Open vs. Closed It seems like a simple question, but there are pros and cons to having an open (railings on the sides so you can see into the adjacent spaces) or closed (walls on all sides) staircase. Here is a brief list of pros/cons: Open Stair pros: Visibility and connection into the spaces around the stairs Opportunity to introduce railing or slat wall design into the space Makes the stair an architectural feature of the space Open Stair cons: The biggest con for an open stair is sound travelling between floors and spaces. Open stairs are typically more expensive than closed stairs Closed stair pros: Keeps noise from travelling between floors and spaces Allows opportunity for doors at the top/bottom of the stair to add more security and sound dampening Typically less expensive than open stairs Closed stair cons: No visual connection between floors and spaces Step 2: Stair Construction The construction type of your stair can significantly change the look and style of your space, but it also has the most impact on the cost of your stair. While there are some up-charges to go from a straight run to a spiral stair shape, the construction type will be a major factor when it comes to budget. Here are just a few examples of construction types: Standard wood frame closed riser ($): This is the most common stair construction type. It’s the least expensive and does not require specialty engineering or construction. These stairs can be open or closed and finished with a variety of materials such as carpet or hardwood. Open riser with closed end ($$): An almost middle-ground between a floating stair and a closed riser stair, this option has “floating” treads between two stringers or walls. The stringers or sides of the stair can be wood or metal and will require some additional engineering. Steel stringer floating tread ($$$): One of the most desired modern stair designs we see requested by clients this stair has a single steel beam in the middle with “floating” treads. These stairs are a great feature for spaces but come at a high price and require specialty engineering and construction. Cantilever stair ($$$$): These stairs appear to “float” off the wall with only one side having a hidden connection point. They require meticulous engineering to ensure there isn’t too much flexibility on the ends furthest from the walls. There are a lot of other factors that go into designing the perfect stair for your home. Stay tuned for more blog posts getting into the fine details of stair design coming soon!
Intentional Interior Design at H2D Architecture + Design
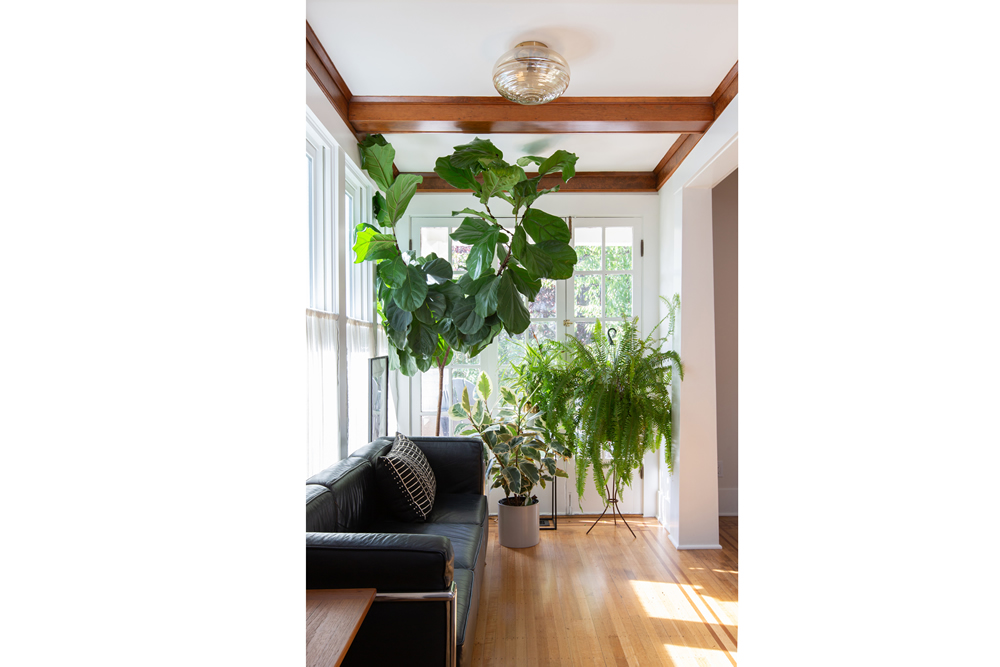
Intentional Interior Design, In House One of the main services we offer at H2D in addition to architectural work is interior design. If you work with us on a remodel or new build, we can help you make finish and fixture selections in a way that pulls together a unified design for the whole home. Offering interior design in house allows for the interiors to be considered from very early on in the architecture process – this is a win for everyone involved in the project! Here’s why… Our team works collaboratively, so often times our interior designer will be part of the schematic and design development phases of the architectural work. This means that we can spot opportunities to add key design elements, arrange components of kitchens and bathrooms in a thoughtful way, and make sure that interior design ideas are captured in the architectural plans. The interior design will be more premeditated rather than an afterthought. Additionally, our familiarity with the plans makes it easier to jump into the interior design phase. This approach benefits the whole team, and lays the groundwork for a more cohesive and beautiful interior. Plus, less mix-ups are likely to occur during construction since everything is communicated clearly between all channels (client, architect, designer, and builder). Our interior design packages include concept boards, digital colorboards (sourced fixtures and finishes), 3D renderings, electrical plans, interior elevations, exterior paint/siding layouts, and documenting selections. The interior design phase occurs simultaneously with the architectural process, starting as soon as the floor plans have been finalized. We kick things off with an introductory questionnaire that you fill out to help give us an idea of your preferences for the style and function of your new spaces. We then curate design concept boards that include inspiration images and ideas to aide in communicating the aesthetic direction. Once we’ve agreed on the direction, our design team begins sourcing finishes and fixtures to put together cohesive colorboards for each space in the project scope. The colorboards include items like cabinetry, flooring, tile, countertops, plumbing fixtures, light fixtures, mirrors, etc. It’s important to note that we do not provide sourcing for furnishings and décor. Each space to be designed will have a board for scheme A and scheme B, from which you can make your selections. We can also provide additional sourcing as needed to get to the point where all selections are finalized and documented into the specification sheets. These boards also include realistic looking renderings to help you visualize the suggested finishes. After you’ve made your selections, we finalize the interior elevations so that they include details about the finishes and fixtures that will be installed, ensuring that the end product turns out as planned. We also check that the electrical plans accurately reflect the placement and requirements needed for the light fixtures that you have chosen. The specification sheets will have information that corresponds with both the interior elevations and the electrical plans. During construction, we are also available to visit the site to consult as needed. Our main goal throughout the whole process is to guide you toward making choices that support your goals as well as the architectural style of your home, resulting in beautiful, functional spaces. It might feel overwhelming, but we will be there to offer guidance and answer your questions along the way. Written by: Lauren Groth, Interior Designer
Amazing Transformation in Innis Arden
H2D worked with the homeowners of this view home in the Innis Arden neighborhood of Shoreline to design a full gut renovation and reconfiguration of their three story home. The design included reconfiguring the main floor of the home for better functionality and flow of the spaces in addition to taking advantage of the sweeping views of the Puget Sound. The stair was relocated and redesigned to open up the entry and provide space for a mud area, powder room, and more functional dining room area. The kitchen was relocated to a different area of the home and redesigned with a new layout with large workspace and generous island. The upper floor was redesigned to be dedicated to the primary suite with large bedroom, bathroom, closet, and office area. The before and after photos illustrate the amazing transformation of the home: Exterior was renovated with a new paint scheme, new exterior railings, modification to the upper floor deck, and new door and window configurations. The kitchen was relocated and redesigned in a new modern style with efficient workspace. The entry was transformed with a new stair layout and expanded double height space. The dining and living areas were relocated and reconfigured for an enhanced layout for flow and connection to the views of the Puget Sound. The fireplace was reversed and updated with more modern finishes. More photos of this project can be found on our website at: https://www.h2darchitects.com/portfolio-item/innis-arden-midcentury-remodel/.
Celebrating the front porch
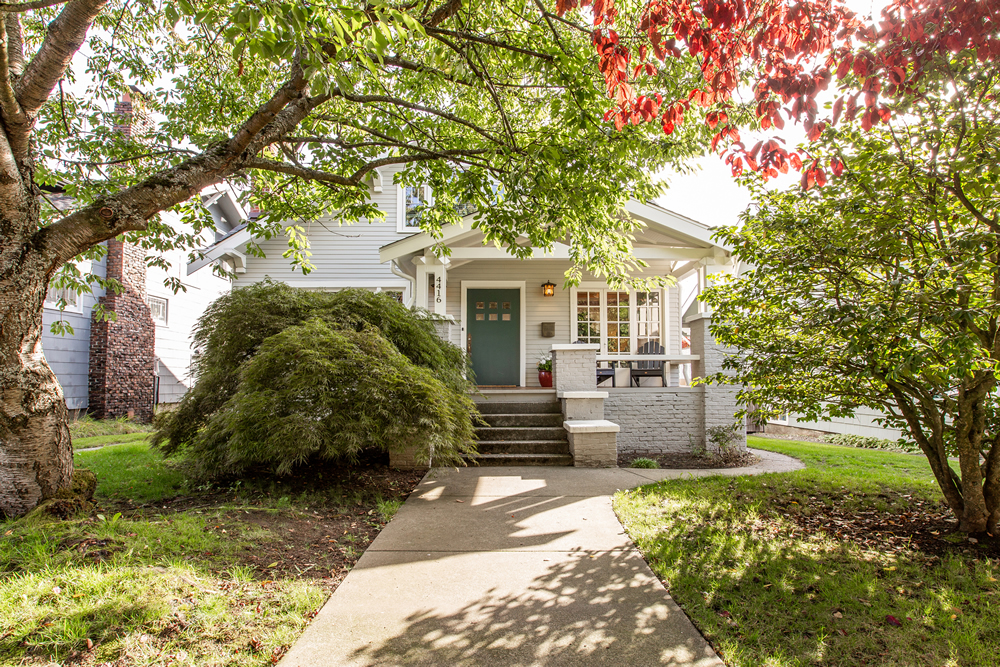
The front porch is not just a place to receive Amazon packages. The front porch is an extension of your home, a connection to the outdoors, and the place where you greet friends and neighbors and welcome them into your home. Life moments happen on the front porch! My kids know the drill… if it’s the first day of school, it’s pictures on the front porch. October 1st means stretching the 8-foot spider web between the porch columns to kick off the Halloween festivities. Strings of lights are hung across the porch roof during the holidays to brighten up the long, dark nights. The American flag waves proudly from the front porch, and if it’s College Game Day, the WSU flag flies. Go Cougs! If your home project allows, a covered front porch adds outdoor living space. Yes, we endure our share of rainy days here in the Pacific Northwest, but we enjoy warm, sunny days as well. Having a deep roof overhang gives protection from the elements almost year-round. Hang a porch swing, stage a couple of Adirondack chairs, make a statement with a custom bench, or if space allows, add a café table and chairs. A small furniture grouping welcomes visitors and says, “stay awhile!” The front door itself says “welcome home!” For added drama, consider an over-sized entry door. One that is wider and/or taller than a standard door. Add windows flanking the door, or a relight above the door, to further open up your space. Maybe you have a view that you want to take advantage of with a front door that is mostly glass. If structural changes are not an option, consider a replacement door in the same opening. A wood door with Craftsman detailing, or a modern, solid slab door will accentuate your entry and should compliment the style of your home. Giving your existing door a fresh coat of paint, with a new pop of color, is another great way to renew the entry to your home. Lighting is a key element in the design of any entry. Porch lighting should be warm and inviting, welcoming visitors to your front door. Wall sconces give good up-down lighting, washing the entry wall with general light. The light fixtures themselves can either be a design statement, an accent to the style of your home, or they can be designed to blend into the architecture of your home. If your space doesn’t allow adding a covered porch, other projects can have a big impact on your existing entry. Expand the approach to your front door by pruning mature landscaping. Install a new stone paver pathway and add pathway lighting – solar powered, for energy savings and ease of installation. Consider landscape lighting as well. Shine a spotlight on a favorite tree or two in the front yard, and when it’s dark the eye is drawn outside giving a sense of spaciousness to your entry. Widen the steps leading up to your front door for a more gracious feel. Don’t forget the details! There are several “smart” doorbells available now with cameras for added security. Consider installing smart outlets on your porch, for things like holiday lights, that can be controlled remotely. Steps illuminated with theater aisle lighting are a welcome feature. Last, but not least, be sure to install your house numbers in a location where they are easy to read. Whether you’re building a new home, planning a remodel or addition, or you simply want to freshen up the look of your space, don’t forget to celebrate the front porch! Written by: Cristy Weller, Architectural Designer at H2D Architecture + Design
Swim Spas versus In-ground Pools
Summertime means swimming – at the beach, in the river, or at the pool. It also means waiting for the weekend or “open” hours, then packing up your gear in the car (including the kids) and traveling to your destination. Want to enjoy swimming during the wintertime? Hopefully there’s an indoor pool or hot spring nearby. But what if you could swim in your own backyard? No travel necessary and “open” hours whenever you want! Private pools allow for not just the recreation of swimming, but also relaxing with your family and entertaining with your friends – any time of day, any day of the year. Thinking about installing a pool, but concerned with the costs, maintenance or whether there is even enough room on your property? You might want to consider a swim spa instead. What is a swim spa? Swim spas are similar to hot tubs but longer in one direction with powerful jets at one end. They are self-contained and have a one-piece molded interior with a heater and pumps for small and large jets, contained in a decorative cabinet for above-ground installation, or can be built into a deck or patio. They have traditional hot tub-style seating and jets at one end, but there is an open area in front of 2 or 3 “swim jets” at the other that allows for swimming or exercising against a strong and variable current. Swim spas are the width of a standard hot tub – about 8 feet – but can range in length from about 12 to 21 feet. The longest spas sometimes have a smaller hot tub at one end and a separate long swim tub at the other. Installation and cost comparisons The smaller footprint of swim spas means a smaller yard is not an impediment to enjoying aquatic recreation at home. Swim spas are often integrated into a deck or patio nearer to the house – sometimes installed within a covered or indoor space (perfect for the rainy Pacific Northwest weather). Because they are about 4’-6” tall, steps are needed for access and can be integrated into a surrounding deck design. In contrast, due to the size of in-ground pools, they often need to be set back farther from the house, with a larger deck or patio to provide access to and around the entire pool. Some jurisdictions’ limit on the hardscape area of a lot is such that a traditional-sized pool can be difficult or impossible to build - even if there is room in the backyard. A level concrete pad is required as a base for a swim spa (or a wood deck engineered and permitted to take the loads of the spa and water), and a permitted dedicated electrical circuit is required for the shutoff, but the costs of and timeline for construction and installation is a fraction of that required for a new in-ground pool. Swim spa delivery can require a crane if access to the yard is limited, but often can be hand-delivered through a side gate – with delivery and hookup taking a matter of hours. After filling the spa with water and allowing time for it to heat to a comfortable temperature (usually overnight) you’re ready to go! Compare this with permitting time for a new permanent in-ground concrete pool plus weeks of construction to install, with possible delays due to weather and ground conditions. Likewise, due to its smaller size, the average cost of heating a swim spa versus an in-ground pool is significantly less. Since smaller amounts of chlorine and other chemicals are needed to maintain clean water in the spa, these monthly maintenance costs are also much lower. In comparison to the swim spa, the greater monthly costs for heating and maintenance of a traditional in-ground pool drives many homeowners to “close” their in-ground pools during the winter months. Year-round comfort If you’ve dreamed about owning a swimming pool but also love the idea of a relaxing hot tub, a swim spa could be an ideal choice combining the best of these worlds. The design options are endless and can add value to your home by integrating a swim spa into a revitalized backyard with a new deck or patio, often combined with an outdoor covered living space or kitchen. And, since the costs and effort of keeping your swim spa heated throughout the year are minimal, it’s easy to pop into a heated spa even during the coldest winter for an exercise session or to relax in the steam and gaze up at the stars. Swim spas often come with a variety of amenities to enhance your enjoyment, including waterfall pillows, colored lights, and even an integrated sound system. There are several companies that sell them, with models that cater to everything from simple family recreation to athletic swim training. With such variety and versatility due to its size and cost, a swim spa could be just the thing to give your home that special touch and your family that much-needed recreation all in the privacy of your own backyard. Written and Photos by: Sarah Thompson, Project Architect
Tips for a home office
The necessity of a home office is growing with many people working from home as a result of the development of virtual conferencing, telecommunications technologies, and more recently Covid-19. It is important to have an efficient space that helps maintain focus and concentration. The need for good lighting and appropriate furniture is also key for success. A guest room, an attic space, a nook under the stairs, or another empty corner in the house can become a nice space to set up your home office. An area close to a window can provide natural light during the day to help keep you motivated. If a window location is not possible, a good table or desk lamp will also be a good alternative. Choose a quiet location or a space where distractions will be kept to a minimum. If you are frequently on calls or video conferencing, a quiet space will be important not only you, but also others in the home that you might bother during the calls. In addition to the location in the home, it is important to focus on surroundings and furniture to create an adequate work space. Among the innovative options for office furniture, the addition of a stand up desk is interesting because it encourages ergonomic best practices by allowing you to both stand and sit during the work day. A comfortable chair that provides adequate support is also important for you to maintain proper posture while sitting at a computer. In combination, choosing the right chair with an adjustable desk can consistently provide comfort throughout the day by allowing you to change position while keeping a computer and the desktop at an adequate level. Small details like boards and planners on the wall are a good idea to track work progress and schedules. If your table is small and does not have a drawer you can try to use shelves to organize papers and books. Lastly, a cup of coffee or tea is always welcome. For these and other design ideas you can follow us on Pinterest: https://www.pinterest.com/h2darchitects/ Written by: Maria Ribeiro, Architectural Designer at H2D Architecture + Design

Thinking of a planning a construction project during the Covid-19 outbreak?
Are you still thinking about your remodel or new construction project but are not sure about to approach it with the quarantine restrictions? Here at H2D, we are still open for business, but we have adapted our process to try to work with the changing times. Are you hesitant to call about your project as you don't want anyone coming to your home? Instead of coming to your home or commercial space, one of our architects or designers will meet with you virtually to do a walk through of your space. During the walk through, we will have you walk through the space with your cell phone, tablet or laptop camera while we will discuss the goals of the remodel, addition or new construction project. Following the walk through, we will discuss the design and construction process with you and answer any questions you may have. From our virtual meeting, H2D will provide you an estimate for your project. Give us a call at 206-542-3734 to discuss your construction project. We look forward to hearing from you!
Historic Homes in a Modern Age: Remodels and Additions
Edmonds historic home The Northwest and greater Seattle area encompasses many historic buildings from the late 1800s and onward in styles ranging from traditional to international and mid-century. These buildings represent the identity and history of a town and its development, and sometimes pay homage to a particular person, architect, or cultural event. H2D has had the pleasure of working on a couple of registered historic houses and is currently exploring an addition project on a home listed in Edmonds. With the relevancy of this project, we are excited to delve into the guidelines and intentions we consider when rehabilitating historic properties. With most remodels and additions, we are looking at achieving a final project that is three things: Respectful. The new work, whether interior alterations or exterior additions, should be sympathetic to the historic building so as not to overwhelm the significant historic features. The project can be just as fresh and exciting even with a thoughtful and modest approach. Paying closer attention at the beginning to making sure the massing, details, and finishes are compatible with the original is well worth the effort. Contextual. On that note, new finishes, materials, and scale should look to the context of the original building for inspiration. This will not only help to blend the style of the new work with the original compatibly, but it will also help with future modifications and resale; a cohesive house with a nod to its historic elements will be timeless and won’t need to keep up with trends. Functional. Historic homes are updated for a reason: we want more from them to live our lives comfortably. This can mean updating the systems of the home: mechanical, plumbing and electrical; installing insulation in the basement, crawlspace or attic; or installing renewable energy systems like solar collectors. Other areas of the home can be more complex; walls of historic homes were built to breathe and adding insulation or a vapor barrier can sometimes cause issues if done improperly. Windows are usually considered one of the most significant features of a historic home and either the repair or the addition of storm windows is strongly encouraged prior to replacement. More information on windows and how to “green-ify” a historic home can be found on the National Trust blog here and here. Updating historic buildings properly and effectively is important to us! One of the main aspects of the historic house that we consider before beginning a design is its “historic significance”. When a house or building is listed on a historic register, there will be a list of the elements of the house that are considered significant to its history in the nomination. If these elements were to be removed, the house would no longer be considered historic. In most cases this will refer to the exterior of the home which includes the roof shape, windows, siding and trim, and porches or other original features. Understanding which elements are significant helps us to determine what can and cannot change in the new project. To do this, we will review the historic nomination for the house and also take a look at the house’s history from records or even simply walking through the building. This research can point out alterations from a later era that should be evaluated before the new project starts. A thorough approach would look to apply the same level of quality and craftsmanship from the original home and consider removing existing alterations that were designed or constructed poorly. Sympathetic additions may also exist and actually add to the house’s history. Most importantly, new and modern elements should be implemented with the utmost care. New additions shouldn’t destroy or cover historic material or areas considered significant to the history of the house. We look to the Secretary of Interior’s Standards for Rehabilitation and Treatment for Historic Properties for our projects which explain these points in much greater depth. If you are considering a renovation on your historic home, we would be happy to consult with you on the project! Ref. https://savingplaces.org/stories/tips-tools-starter-kit-historic-home-renovation#.XS92qehKiUl Written by: Nicole McKernan, Architectural Designer
Main floor remodel in NE Seattle
Opening up the floor plan was the main goal of this Northeast Seattle renovation. The existing home was laid out with several enclosed compact spaces for the kitchen, living and dining areas. These before photos listed below show the existing kitchen and dining areas. H2D worked with the homeowner to design a new layout for the spaces which allowed for an open floor plan to connect the living spaces and create a connection to the rear yard. Several walls were removed between the entry and kitchen areas. The kitchen was fully redesigned with a new layout, finishes, fixtures and appliances. A dark tone cabinet and light colors quartz countertop were used in the kitchen. The cooktop is situated at the island with a raised bar for seating. A unique range hood is installed flush with the ceiling to reduce obscuring the views from the living spaces or bar into the kitchen and out to the rear yard. A small seating area with built in cabinetry is designed next to the kitchen. Hardwood floors were installed throughout the spaces.
Collecting and Storing Rainwater: The Planning Stage
While publicly provided water is often the default choice of home builders and owners because of its convenience of access and use, more and more people are choosing to harvest and store their own water on site to use for irrigation, cleaning, washing, flushing, and drinking. This can be done to supplement or completely replace public water. Some hope to save money or gain complete financial freedom from the utility companies, while others hope to reduce their demand on the environment, as public water requires considerable energy to move from source to user, and it is rarely extracted without impacting the ecosystems that we share the water with. For people living beyond the reach of municipal services as well as those in the cities, having a reserve of water at your home provides security against seasonal shortages, droughts, and even emergencies such as fire (some insurance companies appreciate these measures! See what your insurer says about it). Those of you who have on site access to a source of water may be considering finding some way to hold on to it for your own use rather than watching it all flow by, whether it is a spring, a stream, a well, or rain falling on your roof. While the easiest and cheapest use for on-site water storage is meeting irrigation needs, it is possible for those of you building a new home or renovating your current home to integrate your tank or cistern both visually and functionally with the house itself for indoor uses if you are willing to include the code-required filtration measures. Before going shopping, you will need to determine how big your tank will need to be, where it will need to be placed or built, and what material it should be made from, followed by making sure your tank has all the basic components necessary to provide clean water for a long time with as little trouble as possible. Knowing these things first will help you understand/estimate the associated costs up front and allow you to approach designers, builders, plumbers, or tank and cistern manufacturers with more confidence in the feasibility of your plan. First and foremost, you will want to figure out how big your tank will need to be, because not running out of water is a top priority. This is determined by balancing the amount of water coming from your source against the amount of water being withdrawn for use throughout the year. Using another real-life example, if you know that you will spend more than you will make in December because of the holidays, then you can set aside the excess income from previous months so that you know it will be there when you need it. For a gardener storing rainwater harvested from their roof, they know that they will need their water in the summer, but most of it will be harvested over the colder months while the rains are frequent. Their tank will need to be big enough to harvest enough through the colder months to provide all summer. Someone who has a spring or well producing a set number of gallons per minute year round may have some needs met on demand no problem, but using the washing machine while someone else showers and a third person cleans dishes will need more water for those 20 minutes than the spring can provide. Their tank will collect the steady stream while nobody uses it (overnight) and then be able to provide for the “peak demand” when it comes (usually in the afternoon/evening), and may not need to be as large as the gardener’s. If you are also planning for drought or fire protection, this volume may need to be considered separately from what is provided for everyday use. You can use your water bill to begin to understand your home’s water needs, and further research at home and online can further help you pin down the GPD (gallons per day) your house uses. If this number is beyond what your source can provide for, consider the introduction of water saving fixtures, appliances, and habits that can bring demand down if you haven’t already. The rate that your source produces water will also need to be measured as accurately as possible, so as not to misjudge availability. For rainwater harvesting, there are explanations on how to calculate the harvesting potential of your roof and site in our previous blog entry on rainwater harvesting, as well as local climate data on annual and monthly rainfall available online. After you know how big your tank(s) will be, you will be able to determine where it should go. Limitations on your site such as size, city codes, and location of existing structures may do much to make the decision for you, but where possible you should account for both the location of the water source and the point(s) of use, which would be your home’s plumbing fixtures and/or your garden. Placing the tank below the source and above the point of use allows gravity to provide both pressure and flow for your water as it moves from the source to the sink, so to speak. This saves energy and can decrease or eliminate the need for pumps, saving money and preventing the undesirable possibility that you will lose access to your water if the pumps lose power or break down, although some appliances or uses will need more pressure than gravity can produce, making a small pump necessary. Tanks and cisterns can be installed on solid ground, underground, or atop a structure like a roof or water tower. If you find that placing the tank underground or on a structure are the best options, you will probably need the help of an engineer to ensure the safety and stability of the design. Buried tanks can collapse under soil pressure when they aren’t completely full if they aren’t made specifically for being buried. These tanks will also likely require pumps to access the water, and can be more difficult or inconvenient to access for cleaning and maintenance. Tanks on roofs or other elevated structures require adequate structural stability to handle the massive load of hundreds or thousands of gallons of water, so professional assistance from an engineer will likely be necessary to ensure that your design is safe. Finally, you will want to know what material your tank will be made of. While the material’s ability to meet your tanks design’s structural requirements is very important, it is also important to consider that the water you store and use will spend a lot of time in contact with the tank itself, and different materials can have different effects on the water’s toxicity and taste. For example, glass is an ideal storage medium for small to medium sized applications because it is completely inert (non-toxic) and does not affect the water’s taste, while plastics (PVC especially) can leach small amounts of harmful toxins into the water over time and make it taste like plastic if the tank is exposed to the sun during the day. In Western Washington, Douglas Fir and Western Red Cedar rain barrels will seem a visually appealing option that naturally resists rot. However, the stuff that makes this wood smell good and resist rot is toxic, and can seep into any water in contact with the wood. While this consideration is important for any people/plants/animals that will use the water, cost and availability will also likely affect your decision. Galvanized steel and concrete can both be very expensive, plastic is often cheaper. If you look around your neighborhood or online, you could find used drums and barrels being sold or even given away. This can be a good quick solution that keeps costs down, but make sure that the container in question did not previously hold any hazardous or toxic materials. If this cannot be determined, be a very cautious buyer, as this container will be holding your water. The other cost of any material is the environmental cost. Production of new steel requires enormous amounts of energy and generates considerable waste material that does not return quickly or cleanly to Earth’s natural systems, and both steel and petroleum-based plastics are non-renewable resources. In this regard, it is important to know what your tank is made of, where it comes from, and to utilize reused or recycled materials where possible. These are the essential design considerations to tackle when planning out your water storage system, and with this information in hand, you can feel more confident shopping for and applying your design solution to the problem of water security. If for any reason you feel you cannot tackle some or any of the above questions, there are professional designers and engineers who are willing and able to help you realize your water storage dreams. Feel free to see who in your area works with or specializes in home-scale water storage and other “green” living practices. For those who want more in-depth knowledge of water system design, much of the information in this post and more can be found in the water harvesting and storage related books by Art Ludwig and Brad Lancaster, who both have written extensively about their experience designing and building water systems in many different economic situations, scales, and locations. Additionally, we will cover the essential parts and pieces of an effective water storage system for any who would like to read further. Thank you for reading! Written by: James Drumwright IV, Architectural Designer at H2D Architecture + Design