
NW Ecobuilding Guild Green Home Tour 2024
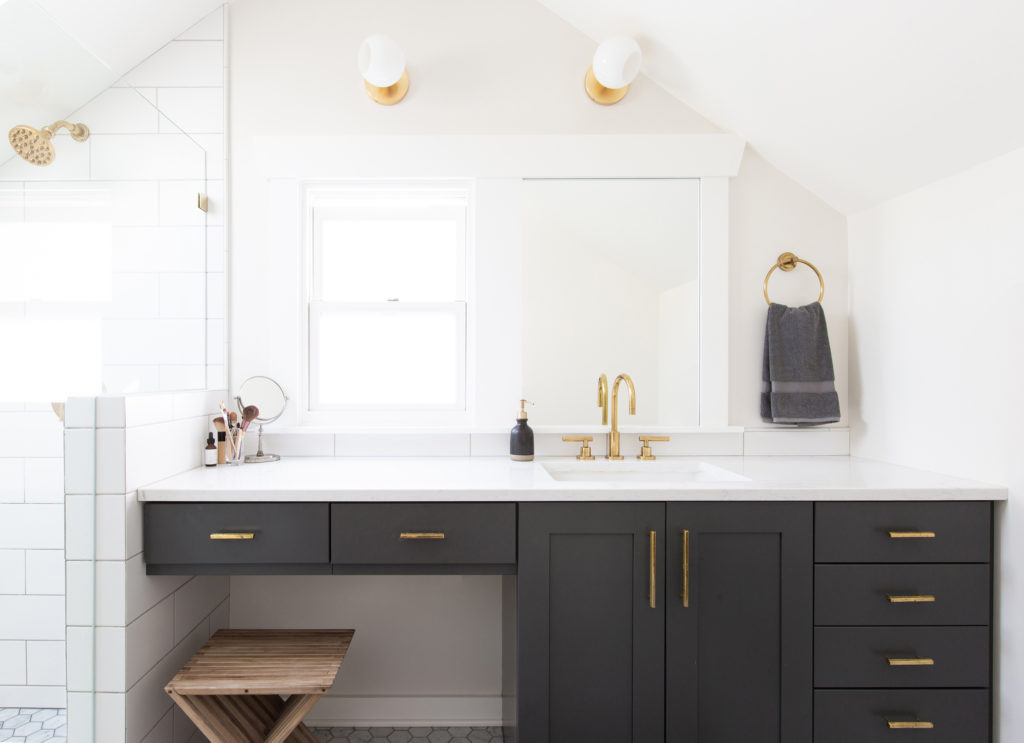
H2D Architecture + Design and Carlisle Classic Homes are excited to announce that one of our recently completed new custom home projects will be featured on the NW Ecobuilding Guild's Green Home Tour on April 27, 2024. This home will be open for in person tours from 11am to 5pm on April 27th, 2024. Please follow this link to learn more and to register for the tour. This high-performance home, the Seward Park Industrial Custom Home, recently completed construction and boasts numerous cutting edge sustainable construction materials and methods, in addition to showcasing a variety of unique design features. Green features of this home include a highly insulated and efficient exterior envelope meeting Passive House air tightness standards, a Structurally Insulated Panel (SIPS) roof system, sustainably sourced wood products, and an efficient HVAC system for heating, cooling, and ventilation. The exterior of the home is built to optimize energy efficiency in the home and provide years of durability. The walls of the home are designed with a combination of products including cellulose insulation, Gutex interlocking wood fiber panel boards, air barrier meeting Passive House air tightness standards, rain screen system, and fibercement panel siding. The modern shed roof is built with Structurally Insulated Panels (SIPS). These technologies work together to provide a highly insulated system that reduces thermal bridging, creates a water resistant and airtight barrier, and allows moisture to escape. The HVAC system is designed for energy efficiency and to create a comfortable environment in the home. The SpacePak system installed in the home provides a multifunctional and multi-zoned system. The system includes in-floor radiant heating and cooling system installed in the exposed concrete floors for both floors of the home, as well as a high-velocity forced air heating, cooling and ventilation system. The home has multiple zones and is customized to provide the occupants with the heating and cooling they desire for the various spaces in the home. The HVAC system, as well as the lighting in the home, is set up with smart technologies allowing the homeowner to easily adjust settings directly in their smart app. Beyond the sustainable aspects of this home, this two-story structure is designed in an modern industrial style with numerous unique design features. The main floor of the home has an open plan with a kitchen, dining, and living room segmented with a three sided fireplace and wall of sliding glass doors leading out to an expansive deck with views of Lake Washington. The gourmet kitchen is designed with high end appliances, custom cabinetry, concrete countertops, custom steel pot rack, and wet bar. Other unique features in the home include a exposed steel beams, large cantilevered roof overhangs, spa-like primary bathroom with smart controls in the shower, wine cellar, office with custom built-ins, and home gym. The industrial modern styling of the home is expressed with exposed steel beams, industrial materials, polished concrete floors, and contemporary finishes. Learn more about the project here!
Intentional Interior Design at H2D Architecture + Design
Intentional Interior Design, In House One of the main services we offer at H2D in addition to architectural work is interior design. If you work with us on a remodel or new build, we can help you make finish and fixture selections in a way that pulls together a unified design for the whole home. Offering interior design in house allows for the interiors to be considered from very early on in the architecture process – this is a win for everyone involved in the project! Here’s why… Our team works collaboratively, so often times our interior designer will be part of the schematic and design development phases of the architectural work. This means that we can spot opportunities to add key design elements, arrange components of kitchens and bathrooms in a thoughtful way, and make sure that interior design ideas are captured in the architectural plans. The interior design will be more premeditated rather than an afterthought. Additionally, our familiarity with the plans makes it easier to jump into the interior design phase. This approach benefits the whole team, and lays the groundwork for a more cohesive and beautiful interior. Plus, less mix-ups are likely to occur during construction since everything is communicated clearly between all channels (client, architect, designer, and builder). Our interior design packages include concept boards, digital colorboards (sourced fixtures and finishes), 3D renderings, electrical plans, interior elevations, exterior paint/siding layouts, and documenting selections. The interior design phase occurs simultaneously with the architectural process, starting as soon as the floor plans have been finalized. We kick things off with an introductory questionnaire that you fill out to help give us an idea of your preferences for the style and function of your new spaces. We then curate design concept boards that include inspiration images and ideas to aide in communicating the aesthetic direction. Once we’ve agreed on the direction, our design team begins sourcing finishes and fixtures to put together cohesive colorboards for each space in the project scope. The colorboards include items like cabinetry, flooring, tile, countertops, plumbing fixtures, light fixtures, mirrors, etc. It’s important to note that we do not provide sourcing for furnishings and décor. Each space to be designed will have a board for scheme A and scheme B, from which you can make your selections. We can also provide additional sourcing as needed to get to the point where all selections are finalized and documented into the specification sheets. These boards also include realistic looking renderings to help you visualize the suggested finishes. After you’ve made your selections, we finalize the interior elevations so that they include details about the finishes and fixtures that will be installed, ensuring that the end product turns out as planned. We also check that the electrical plans accurately reflect the placement and requirements needed for the light fixtures that you have chosen. The specification sheets will have information that corresponds with both the interior elevations and the electrical plans. During construction, we are also available to visit the site to consult as needed. Our main goal throughout the whole process is to guide you toward making choices that support your goals as well as the architectural style of your home, resulting in beautiful, functional spaces. It might feel overwhelming, but we will be there to offer guidance and answer your questions along the way. Written by: Lauren Groth, Interior Designer
How to Find the Balance Between Timeless and Trendy Interior Design
A common concern we hear from our clients is how they can make selections for their remodel that will not go out of style in the next few years. Selecting finishes and fixtures for your home can be daunting and potentially confusing, especially if you’re worried about making smart and timeless choices. Interior finishes and fixtures are like a wardrobe for your house. Imagine if you had to wear the same outfit every day. What would you pick? I bet it wouldn’t be the bright orange and white striped T-shirt, the hot pink shoes, or the sequin sweater. Even if you love those items of clothing individually, that doesn’t mean they’d look good together, or that you’d love them day after day for 10-30+ years. You might, however, consider adding a bold necklace or bright red socks that add little hints of character to a more neutral backdrop. It’s all about balance. Browsing for Inspiration It’s easy to swoon over inspiration photos – we’ve all been there. Something catches your eye and you find yourself daydreaming about living in that space. The aesthetic might be something you haven’t seen before - it might showcase some crazy chandelier or have a bold paint color on the walls. Not to mention, everything in the photo is tidy and organized, brand new, and the budget was incredibly high. Try to see past the shine and notice what it is specifically that you’d like to see in your new space. Here are a few questions you can ask yourself when reviewing inspiration photos: Is there a specific thing in the photo you like OR do you like it’s whole vibe? Is this a style you admire but feels out of your comfort zone? How would your furniture look dropped into this space (if you’re keeping it)? Does it feel like you? Can you see yourself and your household living there? Also, if you’ve been working on a Pinterest board or Houzz ideabook over a long period of time, you may notice that you don’t even like some of the older posts on the page that you were once obsessed with. This is why it’s important to check in with yourself and make sure that what you’ve started liking after spending more time browsing online is still in line with your general style, and not just the latest new thing. Emphasis is Key Find areas where you can have a little fun! Emphasis is key to good design. Rather than picking all unique, brightly colored tiles for the bathroom, use a unique tile just for the backsplash or shower niche against a neutral palette so that it pops. Here are some examples of where it is safer to take risks; most of these items can be swapped out somewhat easily or inexpensively in a few years if you remodel or decide to sell: Cabinet pulls/knobs Paint colors Light fixtures Faucets and shower trim Door levers/knobs Here are examples of where to stick with neutral colors and classic designs: Cabinetry Tile (unless in small quantities) Doors Hardwood flooring Reality Check It might be helpful to contemplate your current or past residences – what did you like or dislike about the design style or selections? Also, think about the logistics of how long you plan to stay in the house. I am all for selecting products that you’re in love with, but consider what the next buyer might think and maybe go more subtle. Most importantly – stick to what feels true to you because it is, after all, your home. Written by: Lauren Groth, Interior Designer with H2D Architecture + Design

Navigating Interior Design Decisions for a Home Remodel
Selecting finishes and fixtures for a remodel is fun and exciting, but it can be very overwhelming if you feel uncertain about the style you are going after. Though many people initially know what they like, there are so many images out there that can pull you in different directions and lead you to feel unsure of how to make those ideas come together cohesively. To make things more complicated, many of our clients are making decisions with their spouse or partner. This can potentially to lead to frustration, but our aim is to help our clients get on the same page and make compromises where necessary so that their completed home will be adored by all parties! Though I’m no marriage counselor, here’s a few steps to help this process go smoothly from the start: Step 1: Individually make a list of needs and wish list items for the remodel. Try to stick to high-level at this point. If you are on the same page, that’s great – but most couples have at least a few discrepancies. Next, you should combine your separate lists into one that captures the items of highest importance from both lists. Step 2: Create a shared collection of inspiration photos using Houzz, Pinterest, or saving pictures in a folder. Try to add notes to the photos you contribute that explain what you like about that space. There will likely be conflicting styles represented in the photo collections, but spending some time reviewing them will help you see what design ideas excite you most. Step 3: Pick a style direction. Although you already have inspiration photos that communicate the design direction you wish to achieve, it is helpful to try to classify the design style with a couple of words as well. Below is a quick style survey you can fill out together and/or separately. Circle your preferences from 1-5 in the categories below: MINIMALIST 1 2 3 4 5 LIVED-IN Clean & utilitarian; you prefer everything to be buttoned up Homey & real; you prefer a space that is allowed to be messy MONOCHROMATIC 1 2 3 4 5 COLORFUL Neutral colors only Color everywhere you look FORMAL 1 2 3 4 5 RELAXED Serious & high-end Casual & approachable CURRENT 1 2 3 4 5 RETRO/ CLASSIC Trendy design with fads & latest technology at the forefront You want designs that reflect a certain time period in design SOFT & NEUTRAL 1 2 3 4 5 RUGGED & BOLD Pale colors and light wood tones, spa-like Deep/rich colors, dark wood tones, textural GLAM 1 2 3 4 5 UNDERSTATED Shiny & showy; think fancy chandeliers Design that doesn’t call attention to itself; somewhat utilitarian URBAN 1 2 3 4 5 RUSTIC City loft, sleek, youthful Cabin or farmhouse, raw materials MODERN 1 2 3 4 5 TRADITIONAL Clean-lined & simple, utilitarian design Ornate details and classic inspiration Step 4: Let us work our magic! We will utilize your lists, photos, surveys, and n otes to come up with the best design possible. We can provide 2-3 schemes to help you explore different aesthetics for each space; this is especially helpful if you’re stuck between two opposing styles, or would like to see a couple different ways one style can be expressed in your home. From that point on, we work together to fine tune the actual selections you would like to go with. If you are a couple, this is where that compromise comes into play again. All said and done, our goal is to give you the process and tools to bring your dream home into reality in a stress-free, organized, and enjoyable way. Written by: Lauren Groth, Interior Designer with H2D Architecture + Design
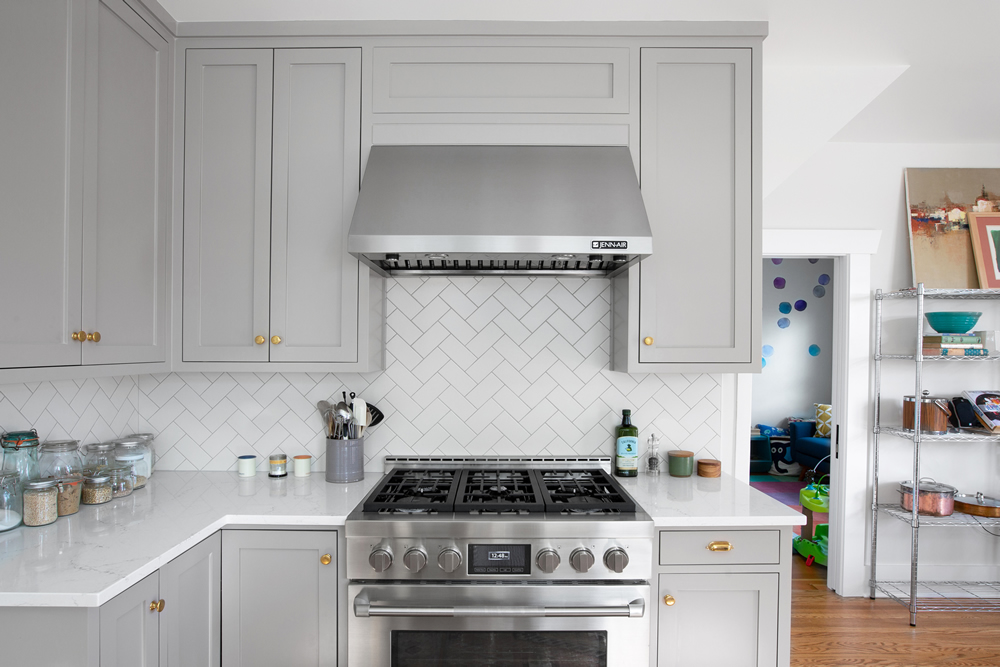
Kitchen Form and Functionality
Photo by Nathaniel Willson. © Nathaniel Willson 2018. All rights reserved. The kitchen is unarguably the hub of the modern-day home. It’s where meals get made, drinks get poured, children plop down for breakfast and so much more. It’s become a very social space but has a history of being behind closed doors. Most homes built before the 60s or 70s were designed with the kitchen adjacent to the dining room; a wall separating the two. Often kitchens had a small nook for an informal breakfast table, but it was never where guests were encouraged to gather for dinner parties. However, the kitchen has a way of drawing people in. Life has become less formal in many ways and hosts no longer care about keeping meal prep behind the scenes if it means they have to be isolated from the rest of the party. Hence the onset of “open floor plans”. Kitchens today also must include a space for guests to sit and engage with their hosts – the kitchen island or peninsula. The kitchen island is the number one request we hear for kitchen remodels. It has become such a staple and has evolved in shape and size. The island encourages involvement in the cooking and entertaining process, provides a place to eat casual meals, adds generous storage, and creates a closer working triangle. When designing a kitchen layout from scratch, it is important to start with function. The working triangle is the efficiency goalpost for kitchens – it is the path connecting the primary zones of the kitchen: sink, range, and refrigerator. A good working triangle makes moving in the kitchen seamless and quick. An elongated triangle usually means that one item is much further out of the way and causes you move slower and sometimes less safely. There is also a secondary triangle made up of the sink, dishwasher, and storage – this path is most used in cleanup and is also quite important because who wants that part to take any longer. Understanding the kitchens of the past help us design more functional kitchens, keeping our current way of life in mind. There will always be new trends, changes in entertaining styles, and technology advancements that evolve kitchen design. Ultimately, it’s up to us to hear the client’s specific desires and provide them with ideas and solutions that work for them and their family. Written by: Lauren Groth, Interior Designer at H2D Architecture + Design
Selecting Exterior Paint Colors
Choosing or changing the exterior color of your home can be overwhelming with so many color options available. It’s great to get ideas from magazines, websites, etc. but what looks great in a photo may not work on your own home. There are multiple factors that come into play that will affect how colors change in appearance from house to house. Keep the following tips in consideration when making your decision will help in picking the right color: Consider your surroundings. Sunlight and vegetation vary from region to region and will have an effect on the appearance of paint colors. The warm desert sky works great with bold orange, yellow, and red paint colors but those same colors in the gray skies of the Pacific Northwest with towering evergreens have a different appearance. Consider your region’s sunlight and vegetation and choose colors that reflect the either warm or cool tones of the light. Note that all colors have warm and cool variations; for example reds can have warm undertones with hints of orange/yellow or cool undertones with a blue/purple undertone so if you love red and live in the Northwest you’re not out of luck! Take into account your home’s architectural style. Whether you have a Midcentury Modern, Cape Cod, or Crafstman home a little research on the era will show an array of palettes that are appropriate to the style. Many paint companies have historical collections which can be a great start to choosing your palette! Three color approach. Ideally your exterior scheme will have 3 colors, although there’s no “rule” against having more or less. Your first color will be your field color, the primary color of the house. Second, an accent color which can be found on doors, small areas of siding, etc. Last is the trim color. The trim is a great way to make a bold statement and add contrast to your home. When you’ve selected a field color you love keep an open mind to a variety of trim colors to find the one that suits your style and vision the best! Test your colors! As mentioned earlier, you can’t rely on photos/paint chips to know how a color will look on your unique home. When you’ve narrowed down your colors grab some samples from the paint store and paint a 2’x2’ square in a discreet location of your home. Check the swatches during different times of the day and under different weather conditions to see how the colors look and change. Written by Lisa Kramer, Designer at H2D