
Keeping up with the changing times – Architecture and Technology
Over the past few years, technology in the field of architecture and design has been rapidly changing. Here are H2D Architecture + Design, we have been continually working on incorporating new technologies into our practice. With the onset of Covid-19, we have taken our technology advancements even further by fully moving to virtual communication with clients to avoid delaying design of current or prospective project during the uncertain times. Here are a few examples of how we work with technology here at H2D: 3D software: The design software that we use is a 2D and 3D format, allowing us to design in both dimensions. The ability to toggle between the 2D and 3D is invaluable for working with clients, as well as coordinating with builders and engineers. Our software also allows the ability for a virtual reality walk through of the proposed project. Virtual Meetings: As our design projects have moved further afield and traffic has worsened (not to mention the restrictions due to Covid-19), H2D has been offering the option to meet with clients and consultants via a virtual format. The virtual meeting allows for us to discuss the plans and review the 3D model live with clients from anywhere in the world. This has been a great option for out-of-state projects, clients with limited time to meet in person, and for a quick spontaneous meeting to discuss a design change. Virtual Walk Through for Potential Clients: H2D has been offering potential customers the option to conduct a virtual walk through of their potential project (home or commercial space). We have been using a similar format to our virtual meetings, as well as Skype and other similar software, to be able to have the client do a walking tour through their building or to discuss a new build via their cell phone or tablet. Following the virtual tour of the home or project discussion, we will discuss our design process and review the County records of the property with the potential clients. This format has proven invaluable for projects further afield, for those with busy schedules, and has allowed for us to continue providing this service during the restrictions we are encountering today with Covid-19.
Historic Homes in a Modern Age: Remodels and Additions
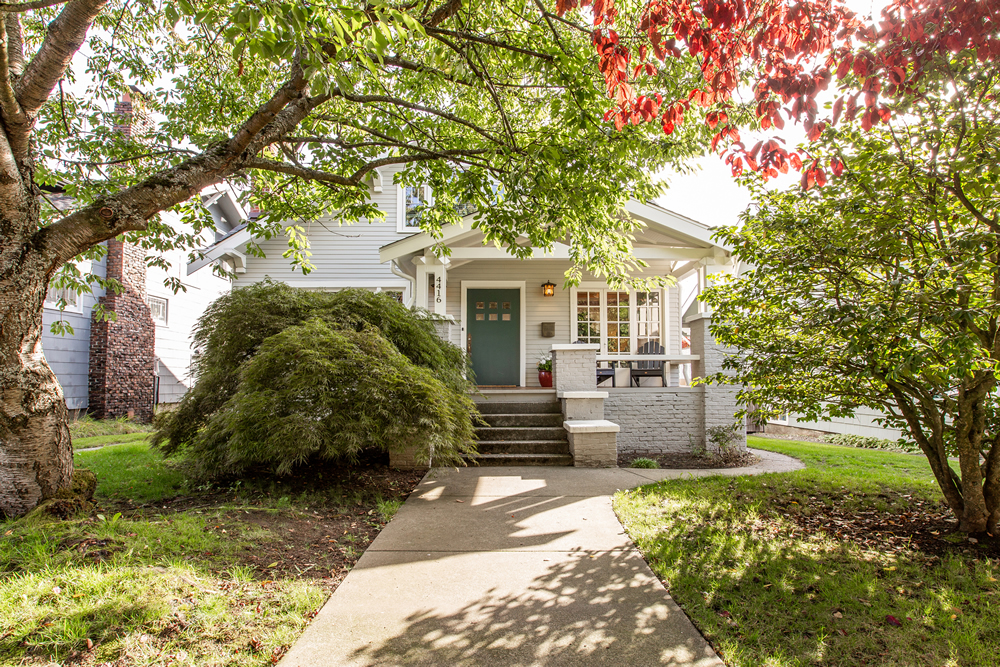
Edmonds historic home The Northwest and greater Seattle area encompasses many historic buildings from the late 1800s and onward in styles ranging from traditional to international and mid-century. These buildings represent the identity and history of a town and its development, and sometimes pay homage to a particular person, architect, or cultural event. H2D has had the pleasure of working on a couple of registered historic houses and is currently exploring an addition project on a home listed in Edmonds. With the relevancy of this project, we are excited to delve into the guidelines and intentions we consider when rehabilitating historic properties. With most remodels and additions, we are looking at achieving a final project that is three things: Respectful. The new work, whether interior alterations or exterior additions, should be sympathetic to the historic building so as not to overwhelm the significant historic features. The project can be just as fresh and exciting even with a thoughtful and modest approach. Paying closer attention at the beginning to making sure the massing, details, and finishes are compatible with the original is well worth the effort. Contextual. On that note, new finishes, materials, and scale should look to the context of the original building for inspiration. This will not only help to blend the style of the new work with the original compatibly, but it will also help with future modifications and resale; a cohesive house with a nod to its historic elements will be timeless and won’t need to keep up with trends. Functional. Historic homes are updated for a reason: we want more from them to live our lives comfortably. This can mean updating the systems of the home: mechanical, plumbing and electrical; installing insulation in the basement, crawlspace or attic; or installing renewable energy systems like solar collectors. Other areas of the home can be more complex; walls of historic homes were built to breathe and adding insulation or a vapor barrier can sometimes cause issues if done improperly. Windows are usually considered one of the most significant features of a historic home and either the repair or the addition of storm windows is strongly encouraged prior to replacement. More information on windows and how to “green-ify” a historic home can be found on the National Trust blog here and here. Updating historic buildings properly and effectively is important to us! One of the main aspects of the historic house that we consider before beginning a design is its “historic significance”. When a house or building is listed on a historic register, there will be a list of the elements of the house that are considered significant to its history in the nomination. If these elements were to be removed, the house would no longer be considered historic. In most cases this will refer to the exterior of the home which includes the roof shape, windows, siding and trim, and porches or other original features. Understanding which elements are significant helps us to determine what can and cannot change in the new project. To do this, we will review the historic nomination for the house and also take a look at the house’s history from records or even simply walking through the building. This research can point out alterations from a later era that should be evaluated before the new project starts. A thorough approach would look to apply the same level of quality and craftsmanship from the original home and consider removing existing alterations that were designed or constructed poorly. Sympathetic additions may also exist and actually add to the house’s history. Most importantly, new and modern elements should be implemented with the utmost care. New additions shouldn’t destroy or cover historic material or areas considered significant to the history of the house. We look to the Secretary of Interior’s Standards for Rehabilitation and Treatment for Historic Properties for our projects which explain these points in much greater depth. If you are considering a renovation on your historic home, we would be happy to consult with you on the project! Ref. https://savingplaces.org/stories/tips-tools-starter-kit-historic-home-renovation#.XS92qehKiUl Written by: Nicole McKernan, Architectural Designer
Saving Energy with Plants
There are many ways to invest in a house to reduce the amount of power and money needed to keep it comfortable year round such as insulation, air tight construction, and more efficient equipment. However, people sometimes overlook what a well-designed layout of trees, bushes, and other plantings can do to contribute to a passive heating and cooling strategy. Mechanical heating and cooling systems are designed to react to changes of temperature after they occur, but smart landscaping can control how the sun and wind interact with your home and prevent or moderate these temperature swings, leaving less work for your home’s mechanical systems. Strategically planted trees can be used as an aid/alternative to mechanical climate control by providing shade and blocking or guiding the winds that blow across your site, which can help maintain a comfortable home environment. Direct sunlight can provide light and warmth but also has the potential to overheat and over-light a space, making it more expensive to keep comfortable. When planting trees for shade, consider where and when you want sunlight coming into your house. In the northern hemisphere, most sunlight comes from the east, south, and west throughout the day, with afternoon/late day sun being the most intense with the most potential to overheat a house. Shade trees planted to the east and west of the house can protect the interior from the brightest and most direct sunlight of the day. Direct southern sunlight can provide free warmth in the winter but has the potential to overheat the same rooms during the summer. While evergreen trees provide a solid column of shade throughout the year, a leafy deciduous tree with its foliage concentrated on the upper portion of the trunk can provide shade from the high angle summer sun while allowing the lower angle winter sun to shine through to warm and light the house when the trees lose their leaves. Study the differences between these trees throughout the year and use this information to decide which trees you need to get the kind of shade you’re looking for. When laying out any tree shading strategy, take into account the full-grown size and shape of the trees you’re planting as well as the angles of the sun throughout the year so that they can be placed where they will be most effective once established. Trees are also useful for blocking and guiding the winds and breezes that blow across your site throughout the year, though this may be more commonly useful on larger sites. If your house is consistently buffeted by cold winter winds coming from the south, a mixed row of evergreen trees and squat bushes/shrubs can push these winds upwards and allow them to pass over the top of your house without stripping your valuable heat off the walls. Again, deciduous and evergreen trees can serve different roles here, with evergreen trees acting as a solid wall to oncoming winds and deciduous trees allowing winds to twist and wind between their trunks and below their canopies. Both can be useful depending on your goals. If there is a cool summer breeze that blows across your site, rows of plantings can also be used to guide rather than block, leading refreshing breezes into your open windows that would otherwise blow by. Laying out your site’s planting to address both sunlight and wind has the potential to significantly reduce power bills by keeping your house from getting too hot or cold in the first place, reducing the need for mechanical heating or cooling. While trees and bushes can have a dramatic effect on your home’s sun and wind exposure, vines are another effective tool for helping keep your house comfortable with less mechanical assistance. Evergreen vines planted against a sunny exterior wall will raise their leaves to the sun and breathe out water vapor (a process known as transpiration) during the summer, which cools the air around them and allows this cooled air to pass over the walls of your house, which helps keep the temperature down. During the winter, these same evergreen vines will become more dormant and lower their leaves against the wall, which creates a pocket of air which can add a small amount of insulation R-value to those walls. Deciduous vines are another helpful option which can be used with a strategy similar to using deciduous trees for seasonal shade. Allowing deciduous vines to grow over a trellis located along your house’s sunniest southern walls can provide shady exterior and interior areas with gentler, filtered sunlight that will also help keep these areas cooler. In the winter, these vines will die back and allow the more desirable winter sun to shine through and warm your house. If you’ve got a green thumb, you can even use food-producing vines to provide both shade and summer snacks. When choosing plants to execute these ideas, remember to seek out native species wherever possible, as these generally have an easier time getting established and thriving in the local environment without additional watering and caretaking, and can contribute to creating a familiar habitat for the other inhabitants of the local ecosystem. If no local species can meet your needs, make sure the plants chosen are not invasive and do not clash with local food chains. If you are interested in exploring these ideas further, there are many resources available online, at your local nursery, and in books on passive cooling and similar strategies involving landscaping in combination with buildings. Good luck! Photo by Nathaniel Willson. © Nathaniel Willson 2018. All rights reserved.
Main floor remodel in NE Seattle
Opening up the floor plan was the main goal of this Northeast Seattle renovation. The existing home was laid out with several enclosed compact spaces for the kitchen, living and dining areas. These before photos listed below show the existing kitchen and dining areas. H2D worked with the homeowner to design a new layout for the spaces which allowed for an open floor plan to connect the living spaces and create a connection to the rear yard. Several walls were removed between the entry and kitchen areas. The kitchen was fully redesigned with a new layout, finishes, fixtures and appliances. A dark tone cabinet and light colors quartz countertop were used in the kitchen. The cooktop is situated at the island with a raised bar for seating. A unique range hood is installed flush with the ceiling to reduce obscuring the views from the living spaces or bar into the kitchen and out to the rear yard. A small seating area with built in cabinetry is designed next to the kitchen. Hardwood floors were installed throughout the spaces.
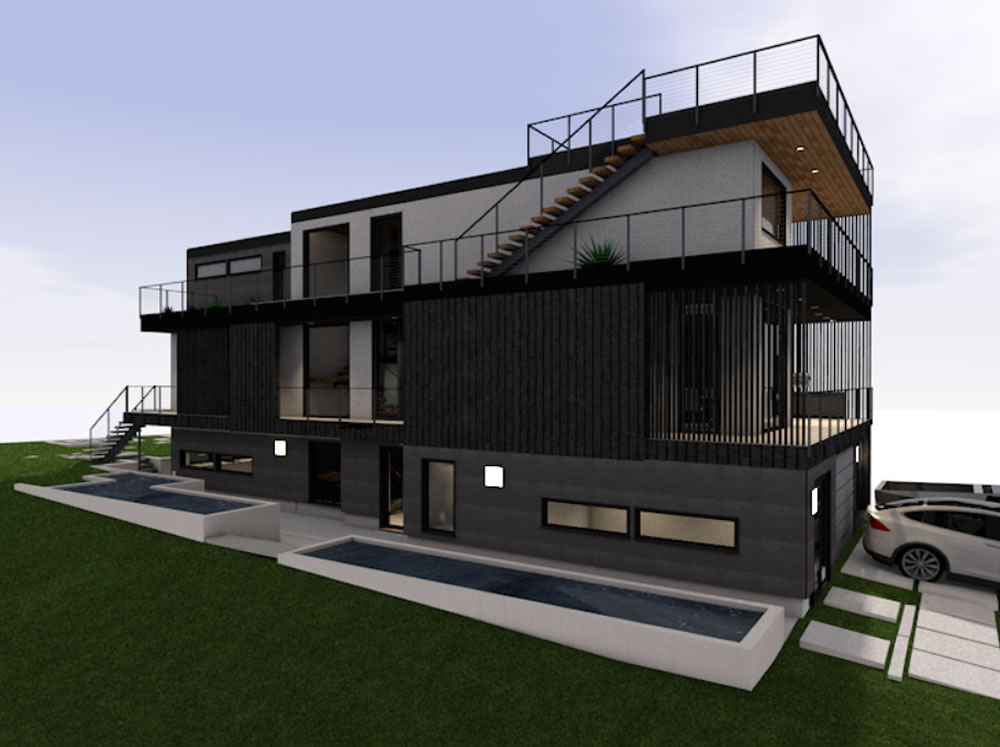
Queen Anne House Lift and Rebuild
The Queen Anne Seattle house lift and rebuild project is well underway in construction! The project entails lifting the existing house, remodeling the main floor and adding a second story addition. This tight urban lot is a challenge for the builder to make this all happen. We are excited to see how this major renovation will completely transform the existing aging home into a beautiful new Craftsman style home for this Seattle family. Please enjoy the time lapse video from the builder, People's Construction: https://www.instagram.com/p/BbNQESMnTOw/?taken-by=peoples_construction https://www.instagram.com/p/BhphgZwAvDR/?taken-by=peoples_construction You can follow peoples_construction on Instragram to see more progress on the project! https://www.instagram.com/peoples_construction/
Living Room 101
The living room is the social gathering space in your home and the design should encourage conversation, create a relaxing atmosphere, and function well for both social occasions and family down-time. Typical living rooms are square or rectangular in shape and vary in size. The following design guidelines apply to all room shapes/sizes to create the perfect living room space! Measure, measure, measure! Write down the dimensions of your room and bring them with you while furniture shopping. If you have your eye on a furniture item you can use string, tape, cardboard, etc. to “mock up” how it will fit and feel in your space. Select furniture that fits the scale of your living room and that work well together. A sectional sofa would overpower a small living room, but is great to break up a large space. Keep the overall scale of your furniture pieces proportionate to one another such as multiple small-scale chairs or a few large items. Similarly scaled pieces create a calming atmosphere. Arrange furniture to promote conversation and invite guests into the space. Furniture pieces should be facing each other as opposed to a media center. Love movie nights? Choose smaller, moveable pieces to allow for re-arranging based on what you’re hosting. To create an inviting space, arrange furniture that allows you to walk directly into the space. It’s best to avoid having the back of a sofa or chair facing the room entry. Built-Ins are a fantastic addition to a living room. They create visual interest and can help keep your space organized. Some great examples of built-ins are a bay window seat or shelving and cabinets around a fireplace. Last, but not least: Lighting! Since our living rooms are used for several purposes it is important to have adjustable lighting levels. An affordable way to add this to an existing space is with dimmable floor/table lamps. If you’re building new, add dimmers to the ceiling lights. Dimmers help to create that great “warm” evening lighting! Try to avoid direct fluorescent light as much as possible. They are cooler in color and can make spaces feel cold and unwelcoming (think big box supermarkets!). LEDs are a great alternative as well as a simple change in lampshades to something with a tan/brown/orange hue to it. This will diffuse the light and give your space the warm glow without sacrificing energy efficiency! Now that your living room is perfectly scaled, arranged, and lit; create a character in your living room that reflects your personality. Use area rugs, pillow, lamps, books/shelves, photographs, and art to bring it to life and make it your own! By Lisa Kramer, Interior and Architectural Designer at H2D Architecture + Design
Insulation Matters
Have you ever wondered what exactly is sandwiched in-between your walls so that the interior of your home stays cozy and is protected from the chilly or hot outdoor temperatures? With current concerns about global warming many people are turning to sustainable solutions in architecture. One approach to decreasing environmental impacts is selecting insulation with lower embodied energy – the sum of all the energy necessary to produce a product and transport it to its desired location. Many people wonder what actions they can take to decrease their carbon footprint. Well, selecting the type of insulation is one way a homeowner can make a significant difference. Conventional insulation including expanded polystyrene or extruded polystyrene applied with hydrofluorocarbon blowing agents are made from fossil fuels that release green house gases with high global warming potential. Selecting insulation that releases less nasty green house gases during production and installation is better for the environment and the health of the people involved in installation. Materials like cellulose – or plant fiber, mineral wool, denim, hemp fiber, straw bale, and mushroom insulation are sustainable alternatives. Cellulose – or plant fiber, is made of post-consumer recycled paper and offers great sound insulation. It is a fitting option for remodels or additions since installation is quite simple. Mineral wool – is made from melted stone or iron spun into fibers, much of which comes from pre-consumer recycled material. Products can come in the form of rigid sheathing used slab-on-grade construction. Denim – is made of recycled cotton from pre-consumer waste scraps or post-consumer jeans. Straw bale – is just that, straw bales, a product that doesn’t keep you guessing. It is made of renewable material that is easily available. Mushroom – or more specifically mycelium, grows on agricultural crop waste. The fungus does not actually produce fruit, so no mushrooms will be growing in your house. It is a cutting edge solution for low-embodied energy insulation, and is currently still in the research and development phase. Fiberglass – is made of spun glass fibers. It is resistant to moisture and bacteria, and is easy to install. Hemp fiber – is a great natural insulator that is biodegradable. They maintain their structure and are resistant to slumping over time. Written by Carmen Ulrich
Make your relationship outlast your construction project
A construction project can be very stressful for your personal relationships, so be sure that all lines of communication are clear and open prior to getting started with the process. Many stressors may be triggered during the design and construction process – miscommunications between you and your partner or other members of the design and construction team, financial stresses from unexpected budgets overruns, or the shear amount of time it takes from your day to day schedule. To help prepare for these stresses, you and your partner should discuss a budget limit prior to the start of design. This budget limit should be shared with your architect and builder, who, as a team, can help you keep on target with your goals. When your design vision exceeds your budget, this can lead to tough and, many times, disappointing decisions that need to be made in order to get the project to fit within the budget. You and your partner may need to sit down together to discuss your highest priorities for the project to decide which items are ‘must-haves’ and which items are ‘nice-to-haves’. Have a strategy for how you will work together with this type of conversation in order to reduce the number of disagreements. Know that your schedule will be stretched in every unexpected way possible. During the design process, there will be numerous meetings to attend and much shopping to be done to prepare for the start of construction. If your time is tight, rely on your architect to assist with selecting materials and finishes. Be prepared to know what you like and to be flexible with what your partner likes, as disagreements may occur between you and your partner when it comes to style. The design process is fluid and flexible, but all parties involved need to communicate and work together. During construction, numerous meetings and questions will start to disrupt your day to day schedule. Before the start of construction, it is best to discuss with your partner and architect as to who will be the main point of contact. Will you or your partner be the person who the contractor will be calling and emailing with endless questions? Or would you prefer to have your architect field questions and only contact you when an important question comes up? With a solid plan for how you will work together, you and your partner should be able to smoothly sail through the trails of a construction project.
Kirkland Second Story Addition and Remodel
Here at H2D Architecture + Design, we have been working with a Kirkland family on a transformative second story addition and remodel to their existing single story home. This family of four was feeling cramped in their home, but loved the location of their home which prompted them to consider a large remodel. We worked closely with the homeowners to tailor the design to their vision for their home. We worked closely with the homeowners through the various design phases to develop the design of the home. The main floor of the home was remodeled to include a double height entry, grand stair to the upper floor, and intimate sitting area off the entry. The existing living spaces were combined into a larger great room, including a living, dining and kitchen area. New square footage on the upper floor included a generous master suite with large walk-in closet, two kids bedrooms, bathroom, and recreation area. The new wood wainscot, cabinetry, trim detailing, and architectural details throughout the home with give the home a traditional feel when complete. The home is currently under construction. Please check back in for new photos as the construction progresses!
Selecting a Kitchen Countertop
It may sound simple to select a kitchen countertop material. When you start looking at all the options available, the decision can become overwhelming. You might want to start the process with a few questions: Are you looking for a low maintenance countertop? In 5 years, do you want your countertop to look as new as the day it was installed or are you okay with patina developing over time? Do you want to use an environmentally friendly material? Do you want to be able to take hot pans out of the oven and set them right on the countertop or do you use trivets? These are just a few of the questions you might start thinking about before starting your search. Here are a few materials that we have used in the projects that H2D Architecture + Design has designed over the years: Novustone - NovuStone is a custom made countertop composed of post-consumer recycled content such as bottle glass, windows and mirrors and other materials such as natural aggregate. The material is durable, stain resistant, and sustainable. H2D has used this beautiful and unique material in both kitchens and bathrooms. Paperstone - Paperstone is a solid surface material composed of 100% post consumer recycled paper combined with a phenolic resin to create a durable, water resistant material. This material is heat resistant to 350 degrees, non-porous, stain resistant, and sustainable. With this material, it is easy to rout in an integral drainboard right next to the sink. There is a palette of colors to pick from. Quartz - There are numerous manufacturers of quartz countertop material. H2D has designed past projects with various brands of quartz, such as: Pental Quartz, Caesarstone, Silestone, Cambria, and Zodiak. Beyond this list of manufacturers, there are many others to pick from. Quartz is composed of natural quartz and a polymer resin to create a hard, resistant countertop material. This material is non-porous, heat resistant, scratch resistant, and stain resistant. There is virtually no maintenance required of this countertop. It works great is both kitchens and bathrooms. H2D has specified quartz countertops for numerous kitchens, wet bars, tub decks, and bathroom vanity countertops. Natural Stone - Natural stone countertops include materials such as granite, marble, quartzite, soap stone, travertine, and others. Granite is a very common and readily available stone. Granite is a durable countertop which requires periodic maintenance. Marble is a baker's favorite countertop, although it is soft, stains easily and can be prone to chips. Some people love the patina that develops on a marble countertop and that is one reason that they choose this material. Quartzite is a hard, durable surface which performs well with stain resistance. A honed quartzite is prone to less staining than polished. Soap stone is dense and doesn't stain as easily as other natural stone countertops, although develops a patina over time like other natural stones. Soapstone can easily be scratched and nicked. Architectural grade soapstone can be fabricated with an integral drain board adjacent to a sink. H2D has designed past projects with marble, granite, and soapstone countertops.