
How to Find the Balance Between Timeless and Trendy Interior Design
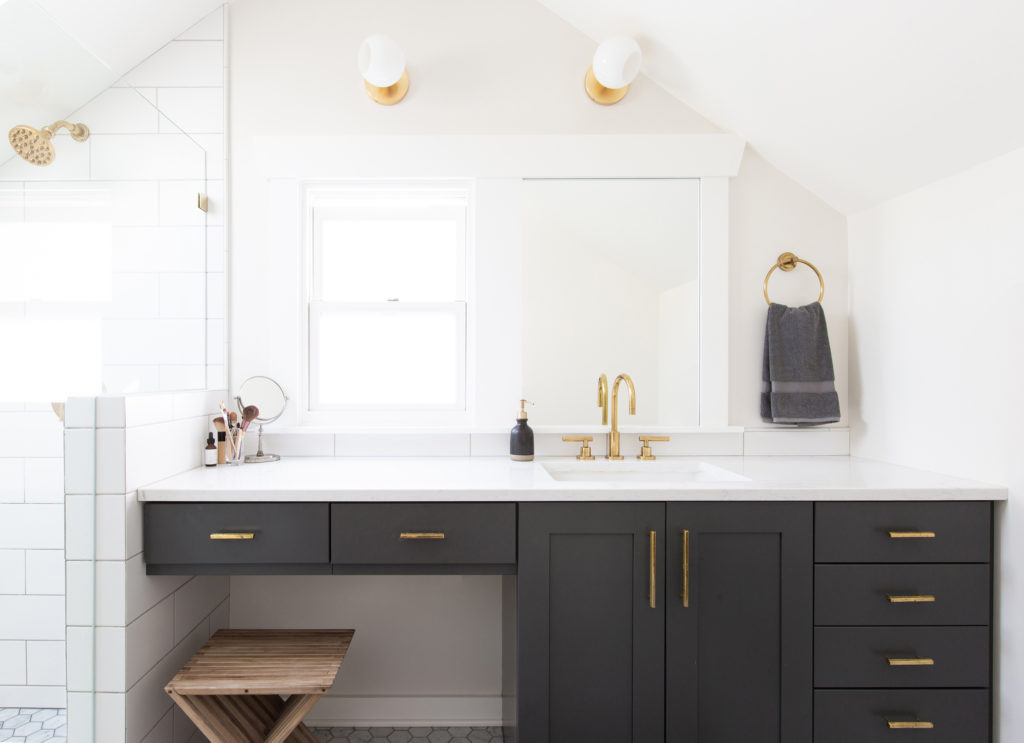
A common concern we hear from our clients is how they can make selections for their remodel that will not go out of style in the next few years. Selecting finishes and fixtures for your home can be daunting and potentially confusing, especially if you’re worried about making smart and timeless choices. Interior finishes and fixtures are like a wardrobe for your house. Imagine if you had to wear the same outfit every day. What would you pick? I bet it wouldn’t be the bright orange and white striped T-shirt, the hot pink shoes, or the sequin sweater. Even if you love those items of clothing individually, that doesn’t mean they’d look good together, or that you’d love them day after day for 10-30+ years. You might, however, consider adding a bold necklace or bright red socks that add little hints of character to a more neutral backdrop. It’s all about balance. Browsing for Inspiration It’s easy to swoon over inspiration photos – we’ve all been there. Something catches your eye and you find yourself daydreaming about living in that space. The aesthetic might be something you haven’t seen before - it might showcase some crazy chandelier or have a bold paint color on the walls. Not to mention, everything in the photo is tidy and organized, brand new, and the budget was incredibly high. Try to see past the shine and notice what it is specifically that you’d like to see in your new space. Here are a few questions you can ask yourself when reviewing inspiration photos: Is there a specific thing in the photo you like OR do you like it’s whole vibe? Is this a style you admire but feels out of your comfort zone? How would your furniture look dropped into this space (if you’re keeping it)? Does it feel like you? Can you see yourself and your household living there? Also, if you’ve been working on a Pinterest board or Houzz ideabook over a long period of time, you may notice that you don’t even like some of the older posts on the page that you were once obsessed with. This is why it’s important to check in with yourself and make sure that what you’ve started liking after spending more time browsing online is still in line with your general style, and not just the latest new thing. Emphasis is Key Find areas where you can have a little fun! Emphasis is key to good design. Rather than picking all unique, brightly colored tiles for the bathroom, use a unique tile just for the backsplash or shower niche against a neutral palette so that it pops. Here are some examples of where it is safer to take risks; most of these items can be swapped out somewhat easily or inexpensively in a few years if you remodel or decide to sell: Cabinet pulls/knobs Paint colors Light fixtures Faucets and shower trim Door levers/knobs Here are examples of where to stick with neutral colors and classic designs: Cabinetry Tile (unless in small quantities) Doors Hardwood flooring Reality Check It might be helpful to contemplate your current or past residences – what did you like or dislike about the design style or selections? Also, think about the logistics of how long you plan to stay in the house. I am all for selecting products that you’re in love with, but consider what the next buyer might think and maybe go more subtle. Most importantly – stick to what feels true to you because it is, after all, your home. Written by: Lauren Groth, Interior Designer with H2D Architecture + Design

Navigating Interior Design Decisions for a Home Remodel
Selecting finishes and fixtures for a remodel is fun and exciting, but it can be very overwhelming if you feel uncertain about the style you are going after. Though many people initially know what they like, there are so many images out there that can pull you in different directions and lead you to feel unsure of how to make those ideas come together cohesively. To make things more complicated, many of our clients are making decisions with their spouse or partner. This can potentially to lead to frustration, but our aim is to help our clients get on the same page and make compromises where necessary so that their completed home will be adored by all parties! Though I’m no marriage counselor, here’s a few steps to help this process go smoothly from the start: Step 1: Individually make a list of needs and wish list items for the remodel. Try to stick to high-level at this point. If you are on the same page, that’s great – but most couples have at least a few discrepancies. Next, you should combine your separate lists into one that captures the items of highest importance from both lists. Step 2: Create a shared collection of inspiration photos using Houzz, Pinterest, or saving pictures in a folder. Try to add notes to the photos you contribute that explain what you like about that space. There will likely be conflicting styles represented in the photo collections, but spending some time reviewing them will help you see what design ideas excite you most. Step 3: Pick a style direction. Although you already have inspiration photos that communicate the design direction you wish to achieve, it is helpful to try to classify the design style with a couple of words as well. Below is a quick style survey you can fill out together and/or separately. Circle your preferences from 1-5 in the categories below: MINIMALIST 1 2 3 4 5 LIVED-IN Clean & utilitarian; you prefer everything to be buttoned up Homey & real; you prefer a space that is allowed to be messy MONOCHROMATIC 1 2 3 4 5 COLORFUL Neutral colors only Color everywhere you look FORMAL 1 2 3 4 5 RELAXED Serious & high-end Casual & approachable CURRENT 1 2 3 4 5 RETRO/ CLASSIC Trendy design with fads & latest technology at the forefront You want designs that reflect a certain time period in design SOFT & NEUTRAL 1 2 3 4 5 RUGGED & BOLD Pale colors and light wood tones, spa-like Deep/rich colors, dark wood tones, textural GLAM 1 2 3 4 5 UNDERSTATED Shiny & showy; think fancy chandeliers Design that doesn’t call attention to itself; somewhat utilitarian URBAN 1 2 3 4 5 RUSTIC City loft, sleek, youthful Cabin or farmhouse, raw materials MODERN 1 2 3 4 5 TRADITIONAL Clean-lined & simple, utilitarian design Ornate details and classic inspiration Step 4: Let us work our magic! We will utilize your lists, photos, surveys, and n otes to come up with the best design possible. We can provide 2-3 schemes to help you explore different aesthetics for each space; this is especially helpful if you’re stuck between two opposing styles, or would like to see a couple different ways one style can be expressed in your home. From that point on, we work together to fine tune the actual selections you would like to go with. If you are a couple, this is where that compromise comes into play again. All said and done, our goal is to give you the process and tools to bring your dream home into reality in a stress-free, organized, and enjoyable way. Written by: Lauren Groth, Interior Designer with H2D Architecture + Design
Tips for a home office
The necessity of a home office is growing with many people working from home as a result of the development of virtual conferencing, telecommunications technologies, and more recently Covid-19. It is important to have an efficient space that helps maintain focus and concentration. The need for good lighting and appropriate furniture is also key for success. A guest room, an attic space, a nook under the stairs, or another empty corner in the house can become a nice space to set up your home office. An area close to a window can provide natural light during the day to help keep you motivated. If a window location is not possible, a good table or desk lamp will also be a good alternative. Choose a quiet location or a space where distractions will be kept to a minimum. If you are frequently on calls or video conferencing, a quiet space will be important not only you, but also others in the home that you might bother during the calls. In addition to the location in the home, it is important to focus on surroundings and furniture to create an adequate work space. Among the innovative options for office furniture, the addition of a stand up desk is interesting because it encourages ergonomic best practices by allowing you to both stand and sit during the work day. A comfortable chair that provides adequate support is also important for you to maintain proper posture while sitting at a computer. In combination, choosing the right chair with an adjustable desk can consistently provide comfort throughout the day by allowing you to change position while keeping a computer and the desktop at an adequate level. Small details like boards and planners on the wall are a good idea to track work progress and schedules. If your table is small and does not have a drawer you can try to use shelves to organize papers and books. Lastly, a cup of coffee or tea is always welcome. For these and other design ideas you can follow us on Pinterest: https://www.pinterest.com/h2darchitects/ Written by: Maria Ribeiro, Architectural Designer at H2D Architecture + Design
Kitchen Form and Functionality
Photo by Nathaniel Willson. © Nathaniel Willson 2018. All rights reserved. The kitchen is unarguably the hub of the modern-day home. It’s where meals get made, drinks get poured, children plop down for breakfast and so much more. It’s become a very social space but has a history of being behind closed doors. Most homes built before the 60s or 70s were designed with the kitchen adjacent to the dining room; a wall separating the two. Often kitchens had a small nook for an informal breakfast table, but it was never where guests were encouraged to gather for dinner parties. However, the kitchen has a way of drawing people in. Life has become less formal in many ways and hosts no longer care about keeping meal prep behind the scenes if it means they have to be isolated from the rest of the party. Hence the onset of “open floor plans”. Kitchens today also must include a space for guests to sit and engage with their hosts – the kitchen island or peninsula. The kitchen island is the number one request we hear for kitchen remodels. It has become such a staple and has evolved in shape and size. The island encourages involvement in the cooking and entertaining process, provides a place to eat casual meals, adds generous storage, and creates a closer working triangle. When designing a kitchen layout from scratch, it is important to start with function. The working triangle is the efficiency goalpost for kitchens – it is the path connecting the primary zones of the kitchen: sink, range, and refrigerator. A good working triangle makes moving in the kitchen seamless and quick. An elongated triangle usually means that one item is much further out of the way and causes you move slower and sometimes less safely. There is also a secondary triangle made up of the sink, dishwasher, and storage – this path is most used in cleanup and is also quite important because who wants that part to take any longer. Understanding the kitchens of the past help us design more functional kitchens, keeping our current way of life in mind. There will always be new trends, changes in entertaining styles, and technology advancements that evolve kitchen design. Ultimately, it’s up to us to hear the client’s specific desires and provide them with ideas and solutions that work for them and their family. Written by: Lauren Groth, Interior Designer at H2D Architecture + Design
Thinking of a planning a construction project during the Covid-19 outbreak?
Are you still thinking about your remodel or new construction project but are not sure about to approach it with the quarantine restrictions? Here at H2D, we are still open for business, but we have adapted our process to try to work with the changing times. Are you hesitant to call about your project as you don't want anyone coming to your home? Instead of coming to your home or commercial space, one of our architects or designers will meet with you virtually to do a walk through of your space. During the walk through, we will have you walk through the space with your cell phone, tablet or laptop camera while we will discuss the goals of the remodel, addition or new construction project. Following the walk through, we will discuss the design and construction process with you and answer any questions you may have. From our virtual meeting, H2D will provide you an estimate for your project. Give us a call at 206-542-3734 to discuss your construction project. We look forward to hearing from you!
Keeping up with the changing times – Architecture and Technology
Over the past few years, technology in the field of architecture and design has been rapidly changing. Here are H2D Architecture + Design, we have been continually working on incorporating new technologies into our practice. With the onset of Covid-19, we have taken our technology advancements even further by fully moving to virtual communication with clients to avoid delaying design of current or prospective project during the uncertain times. Here are a few examples of how we work with technology here at H2D: 3D software: The design software that we use is a 2D and 3D format, allowing us to design in both dimensions. The ability to toggle between the 2D and 3D is invaluable for working with clients, as well as coordinating with builders and engineers. Our software also allows the ability for a virtual reality walk through of the proposed project. Virtual Meetings: As our design projects have moved further afield and traffic has worsened (not to mention the restrictions due to Covid-19), H2D has been offering the option to meet with clients and consultants via a virtual format. The virtual meeting allows for us to discuss the plans and review the 3D model live with clients from anywhere in the world. This has been a great option for out-of-state projects, clients with limited time to meet in person, and for a quick spontaneous meeting to discuss a design change. Virtual Walk Through for Potential Clients: H2D has been offering potential customers the option to conduct a virtual walk through of their potential project (home or commercial space). We have been using a similar format to our virtual meetings, as well as Skype and other similar software, to be able to have the client do a walking tour through their building or to discuss a new build via their cell phone or tablet. Following the virtual tour of the home or project discussion, we will discuss our design process and review the County records of the property with the potential clients. This format has proven invaluable for projects further afield, for those with busy schedules, and has allowed for us to continue providing this service during the restrictions we are encountering today with Covid-19.
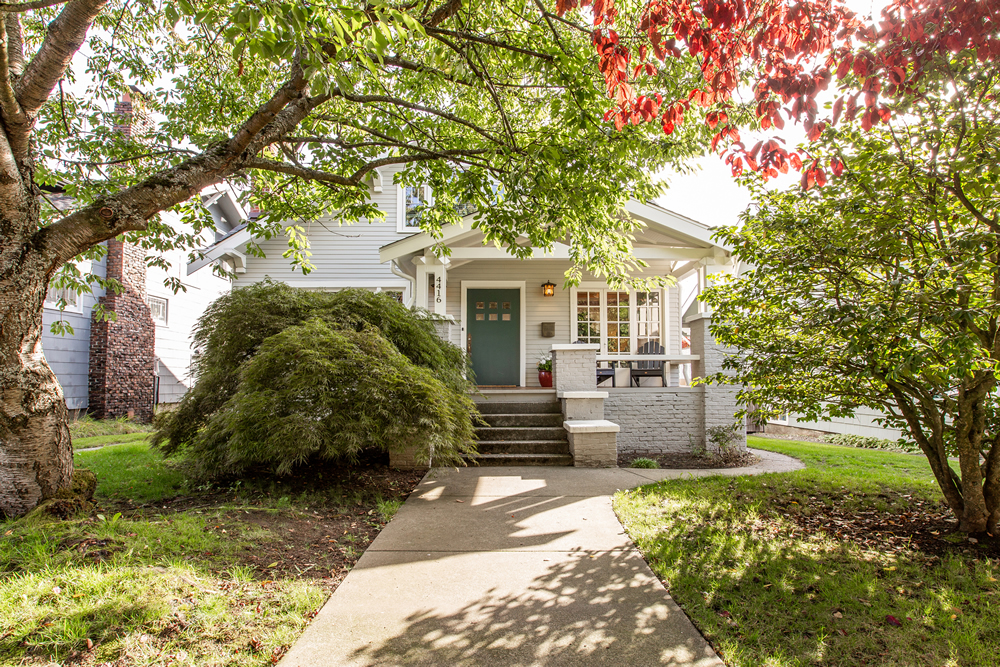
Historic Homes in a Modern Age: Remodels and Additions
Edmonds historic home The Northwest and greater Seattle area encompasses many historic buildings from the late 1800s and onward in styles ranging from traditional to international and mid-century. These buildings represent the identity and history of a town and its development, and sometimes pay homage to a particular person, architect, or cultural event. H2D has had the pleasure of working on a couple of registered historic houses and is currently exploring an addition project on a home listed in Edmonds. With the relevancy of this project, we are excited to delve into the guidelines and intentions we consider when rehabilitating historic properties. With most remodels and additions, we are looking at achieving a final project that is three things: Respectful. The new work, whether interior alterations or exterior additions, should be sympathetic to the historic building so as not to overwhelm the significant historic features. The project can be just as fresh and exciting even with a thoughtful and modest approach. Paying closer attention at the beginning to making sure the massing, details, and finishes are compatible with the original is well worth the effort. Contextual. On that note, new finishes, materials, and scale should look to the context of the original building for inspiration. This will not only help to blend the style of the new work with the original compatibly, but it will also help with future modifications and resale; a cohesive house with a nod to its historic elements will be timeless and won’t need to keep up with trends. Functional. Historic homes are updated for a reason: we want more from them to live our lives comfortably. This can mean updating the systems of the home: mechanical, plumbing and electrical; installing insulation in the basement, crawlspace or attic; or installing renewable energy systems like solar collectors. Other areas of the home can be more complex; walls of historic homes were built to breathe and adding insulation or a vapor barrier can sometimes cause issues if done improperly. Windows are usually considered one of the most significant features of a historic home and either the repair or the addition of storm windows is strongly encouraged prior to replacement. More information on windows and how to “green-ify” a historic home can be found on the National Trust blog here and here. Updating historic buildings properly and effectively is important to us! One of the main aspects of the historic house that we consider before beginning a design is its “historic significance”. When a house or building is listed on a historic register, there will be a list of the elements of the house that are considered significant to its history in the nomination. If these elements were to be removed, the house would no longer be considered historic. In most cases this will refer to the exterior of the home which includes the roof shape, windows, siding and trim, and porches or other original features. Understanding which elements are significant helps us to determine what can and cannot change in the new project. To do this, we will review the historic nomination for the house and also take a look at the house’s history from records or even simply walking through the building. This research can point out alterations from a later era that should be evaluated before the new project starts. A thorough approach would look to apply the same level of quality and craftsmanship from the original home and consider removing existing alterations that were designed or constructed poorly. Sympathetic additions may also exist and actually add to the house’s history. Most importantly, new and modern elements should be implemented with the utmost care. New additions shouldn’t destroy or cover historic material or areas considered significant to the history of the house. We look to the Secretary of Interior’s Standards for Rehabilitation and Treatment for Historic Properties for our projects which explain these points in much greater depth. If you are considering a renovation on your historic home, we would be happy to consult with you on the project! Ref. https://savingplaces.org/stories/tips-tools-starter-kit-historic-home-renovation#.XS92qehKiUl Written by: Nicole McKernan, Architectural Designer
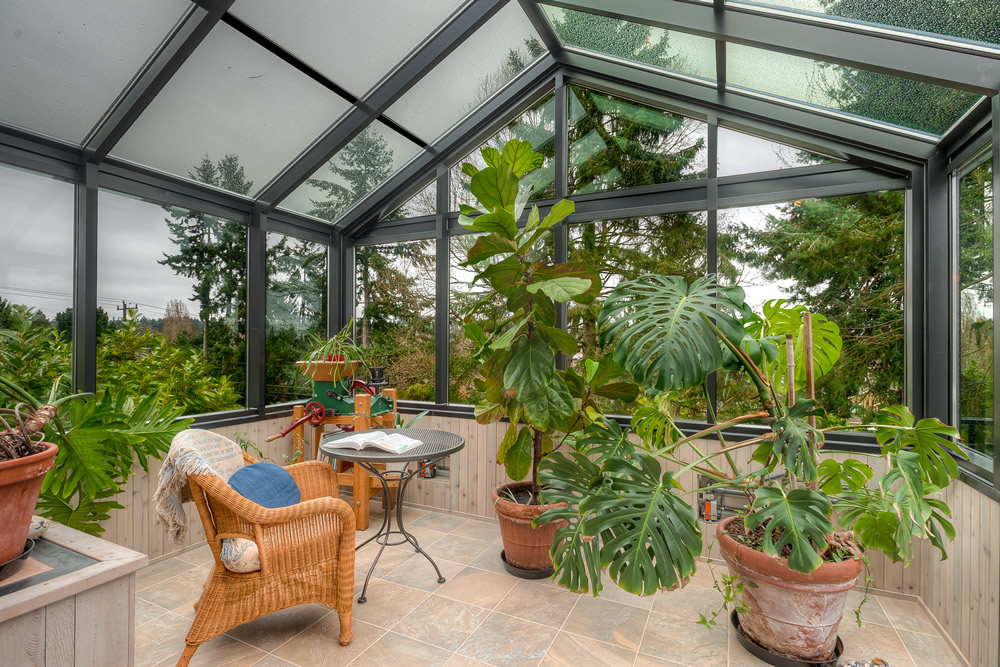
Saving Energy with Plants
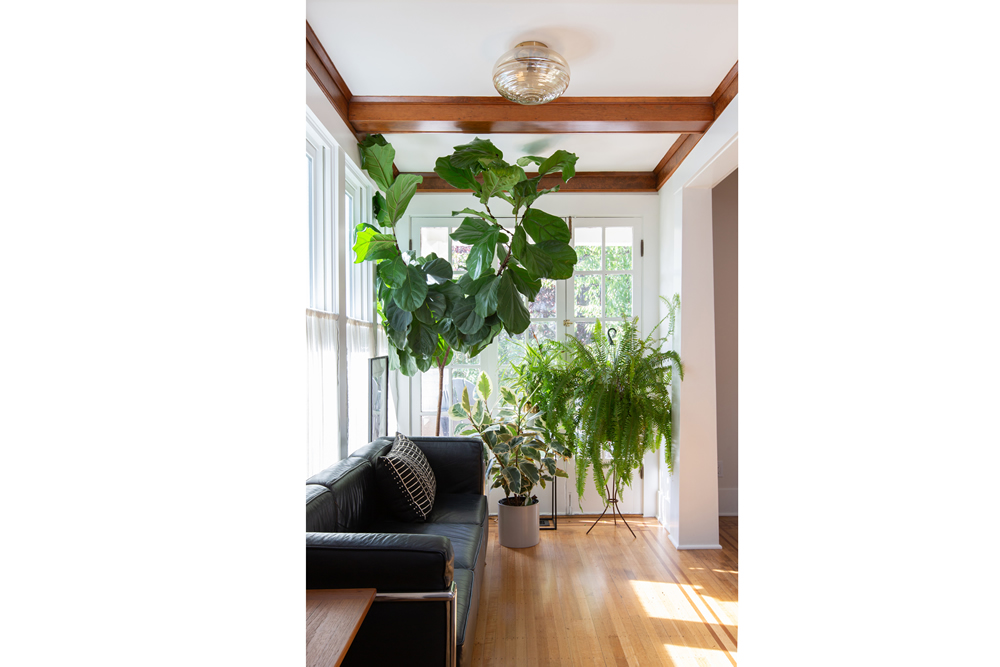
There are many ways to invest in a house to reduce the amount of power and money needed to keep it comfortable year round such as insulation, air tight construction, and more efficient equipment. However, people sometimes overlook what a well-designed layout of trees, bushes, and other plantings can do to contribute to a passive heating and cooling strategy. Mechanical heating and cooling systems are designed to react to changes of temperature after they occur, but smart landscaping can control how the sun and wind interact with your home and prevent or moderate these temperature swings, leaving less work for your home’s mechanical systems. Strategically planted trees can be used as an aid/alternative to mechanical climate control by providing shade and blocking or guiding the winds that blow across your site, which can help maintain a comfortable home environment. Direct sunlight can provide light and warmth but also has the potential to overheat and over-light a space, making it more expensive to keep comfortable. When planting trees for shade, consider where and when you want sunlight coming into your house. In the northern hemisphere, most sunlight comes from the east, south, and west throughout the day, with afternoon/late day sun being the most intense with the most potential to overheat a house. Shade trees planted to the east and west of the house can protect the interior from the brightest and most direct sunlight of the day. Direct southern sunlight can provide free warmth in the winter but has the potential to overheat the same rooms during the summer. While evergreen trees provide a solid column of shade throughout the year, a leafy deciduous tree with its foliage concentrated on the upper portion of the trunk can provide shade from the high angle summer sun while allowing the lower angle winter sun to shine through to warm and light the house when the trees lose their leaves. Study the differences between these trees throughout the year and use this information to decide which trees you need to get the kind of shade you’re looking for. When laying out any tree shading strategy, take into account the full-grown size and shape of the trees you’re planting as well as the angles of the sun throughout the year so that they can be placed where they will be most effective once established. Trees are also useful for blocking and guiding the winds and breezes that blow across your site throughout the year, though this may be more commonly useful on larger sites. If your house is consistently buffeted by cold winter winds coming from the south, a mixed row of evergreen trees and squat bushes/shrubs can push these winds upwards and allow them to pass over the top of your house without stripping your valuable heat off the walls. Again, deciduous and evergreen trees can serve different roles here, with evergreen trees acting as a solid wall to oncoming winds and deciduous trees allowing winds to twist and wind between their trunks and below their canopies. Both can be useful depending on your goals. If there is a cool summer breeze that blows across your site, rows of plantings can also be used to guide rather than block, leading refreshing breezes into your open windows that would otherwise blow by. Laying out your site’s planting to address both sunlight and wind has the potential to significantly reduce power bills by keeping your house from getting too hot or cold in the first place, reducing the need for mechanical heating or cooling. While trees and bushes can have a dramatic effect on your home’s sun and wind exposure, vines are another effective tool for helping keep your house comfortable with less mechanical assistance. Evergreen vines planted against a sunny exterior wall will raise their leaves to the sun and breathe out water vapor (a process known as transpiration) during the summer, which cools the air around them and allows this cooled air to pass over the walls of your house, which helps keep the temperature down. During the winter, these same evergreen vines will become more dormant and lower their leaves against the wall, which creates a pocket of air which can add a small amount of insulation R-value to those walls. Deciduous vines are another helpful option which can be used with a strategy similar to using deciduous trees for seasonal shade. Allowing deciduous vines to grow over a trellis located along your house’s sunniest southern walls can provide shady exterior and interior areas with gentler, filtered sunlight that will also help keep these areas cooler. In the winter, these vines will die back and allow the more desirable winter sun to shine through and warm your house. If you’ve got a green thumb, you can even use food-producing vines to provide both shade and summer snacks. When choosing plants to execute these ideas, remember to seek out native species wherever possible, as these generally have an easier time getting established and thriving in the local environment without additional watering and caretaking, and can contribute to creating a familiar habitat for the other inhabitants of the local ecosystem. If no local species can meet your needs, make sure the plants chosen are not invasive and do not clash with local food chains. If you are interested in exploring these ideas further, there are many resources available online, at your local nursery, and in books on passive cooling and similar strategies involving landscaping in combination with buildings. Good luck! Photo by Nathaniel Willson. © Nathaniel Willson 2018. All rights reserved.
Main floor remodel in NE Seattle
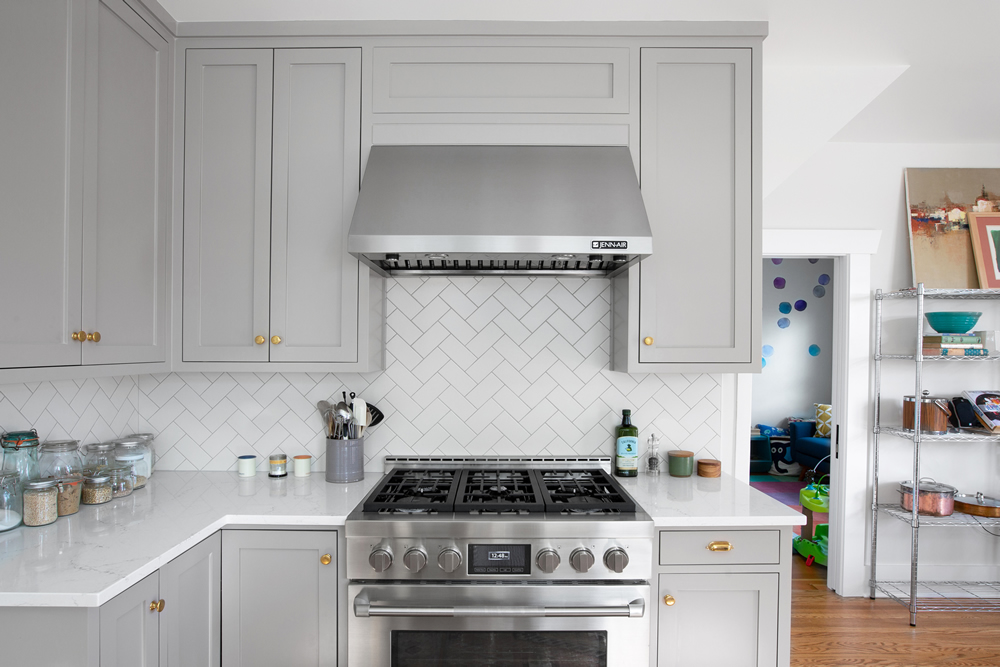
Opening up the floor plan was the main goal of this Northeast Seattle renovation. The existing home was laid out with several enclosed compact spaces for the kitchen, living and dining areas. These before photos listed below show the existing kitchen and dining areas. H2D worked with the homeowner to design a new layout for the spaces which allowed for an open floor plan to connect the living spaces and create a connection to the rear yard. Several walls were removed between the entry and kitchen areas. The kitchen was fully redesigned with a new layout, finishes, fixtures and appliances. A dark tone cabinet and light colors quartz countertop were used in the kitchen. The cooktop is situated at the island with a raised bar for seating. A unique range hood is installed flush with the ceiling to reduce obscuring the views from the living spaces or bar into the kitchen and out to the rear yard. A small seating area with built in cabinetry is designed next to the kitchen. Hardwood floors were installed throughout the spaces.
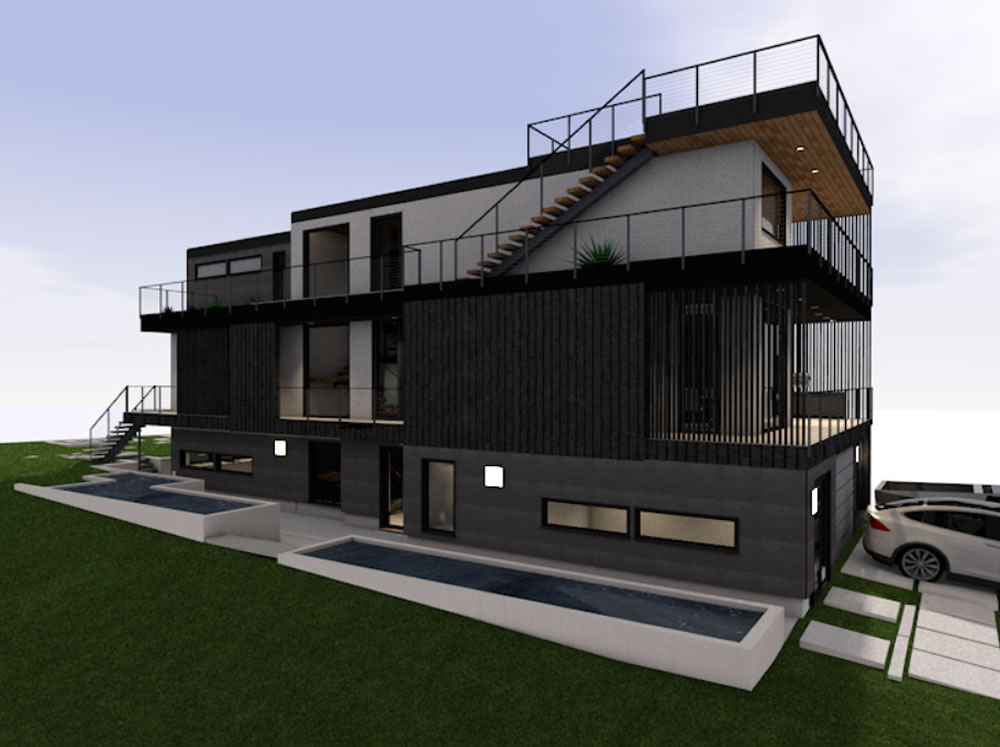
Queen Anne House Lift and Rebuild
The Queen Anne Seattle house lift and rebuild project is well underway in construction! The project entails lifting the existing house, remodeling the main floor and adding a second story addition. This tight urban lot is a challenge for the builder to make this all happen. We are excited to see how this major renovation will completely transform the existing aging home into a beautiful new Craftsman style home for this Seattle family. Please enjoy the time lapse video from the builder, People's Construction: https://www.instagram.com/p/BbNQESMnTOw/?taken-by=peoples_construction https://www.instagram.com/p/BhphgZwAvDR/?taken-by=peoples_construction You can follow peoples_construction on Instragram to see more progress on the project! https://www.instagram.com/peoples_construction/